So I finally got around to working with some technologies that have been on my hot-list for quite some time. NodeJS, React, and MongoDB see a lot of use in the application development industry and it was high time I put my nose into them. I decided to toss in some AWS as I also wanted to learn how to work with S3 buckets. Why not, right?
The gist of this little project was to create a front-end interface along with a back-end API for it to interact with. As far as the front-end goes, my main goals were to consume enough of React to understand its asynchronous nature and how to provide a decent interactive experience with regards to its functionality. The back-end would handle uploading, deleting, and creating signed urls within the context of AWS’ S3 service in addition to interacting with a MongoDB database that would keep track of any uploaded objects.
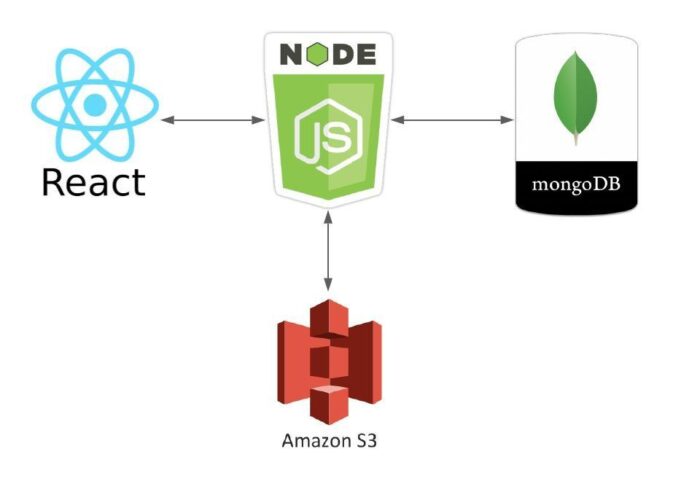
The following diagram summarizes the interactions of each component.
You can find all of the code featured in this blog post in my Github account at the following URL. I’ve included all of the requests the back-end API accepts (aside from a call to “/uploadFile” – which can be captured with a proxy) in text files so you can pull them into Burp, Zap, Fiddler, or Postmon.
https://github.com/ryan-wendel/react-node-mongo-s3-app
All things considered, nothing in this post is overwhelmingly technical or impressive. It’s a simplistic app that interacts with AWS S3 and DynamoDB. Hopefully, someone will take something from it should they happen to run across my little portion of the web.
A gratuitous screenshot because we all know waiting until the end would be far too excruciating!

Disclaimer: I am not a Node, React, or Mongo expert and it’s highly likely I’ll use some terminology that doesn’t quite fit and do things in an unconventional manner. By all means, leave a comment and inform me of something I’ve missed or got wrong should you be so inclined. I’m always open to constructive comments.
To kick things off I’ll start by explaining that I wanted the application to allow for multiple file types that carry different characteristics.
- Restrictions on mime-types
- Restrictions on file extensions
- A specific S3 bucket
- A specific S3 bucket path
- A few pieces of info to populate the front-end with
Basically, I wanted to approach the design by making the application extensible via the use of JSON shoved into a NoSQL database. More on that later…
Knowing there would be multiple file types I went ahead and created two different buckets to illustrate this baked-in extensibility. Yes, a single bucket would have sufficed but I wanted to demonstrate using more than one. The application is designed to hand out download links to users via S3 pre-signed URLs. As such, a bucket used by a given file-type does not need to be made public.
For the sake of this proof-of-concept, the following buckets will be utilized:
- foo.ryanwendel.com
- bar.ryanwendel.com
The following AWS S3 policy was placed in-line for an AWS IAM user with programmatic access. If I were hosting this in AWS, I would create an assumable role, but I’ll not get into that and save it for another day.
{
    "Version": "2012-10-17",
    "Statement": [
        {
            "Effect": "Allow",
            "Action": [
                "s3:ListBucket"
            ],
            "Resource": [
                "arn:aws:s3:::foo.ryanwendel.com",
                "arn:aws:s3:::bar.ryanwendel.com"
            ]
        },
        {
            "Effect": "Allow",
            "Action": [
                "s3:GetObject",
                "s3:PutObject",
                "s3:DeleteObject"
            ],
            "Resource": [
                "arn:aws:s3:::foo.ryanwendel.com/books/*",
                "arn:aws:s3:::bar.ryanwendel.com/files/images/*"
            ]
        }
    ]
}
Make note of your IAM user’s credentials when creating your user. Console access is not necessary so make sure to abide by the Principle of Least Privilege and do not provide it to your application’s user.
From here we’ll set up our MongoDB database. Assuming that you’ve just installed MongoDB, let’s lock it down in terms of requiring password authentication. With a fresh install, access the command-line interface using the following:
# mongo
Then configure a password for an administrative user using the following.
use admin
db.createUser(
  {
    user: "root",
    pwd: "BadPassword123!",
    roles: [ { role: "userAdminAnyDatabase", db: "admin" }, "readWriteAnyDatabase" ]
  }
)
Exit the cli and edit the main MongoDB configuration file (mine was /etc/mongod.conf). Add the following two lines to the bottom:
security:
    authorization: enabled
Once done with editing the config file, restart the server.
# systemctl restart mongod
Log back in as the administrative account and create an application user. You’d use the following to do this.
$ mongo --port 27017 --authenticationDatabase "admin" -u "root" -p
Once logged in as an admin user, execute the following commands to create a service account and database for your application.
use s3upload
db.createUser(
  {
    user: "s3upload",
    pwd: "S3UploadBBQ",
    roles: [ { role: "readWrite", db: "s3upload" } ]
  }
)
Log out and then back in using your newly created application user.
$ mongo --port 27017 --authenticationDatabase "s3upload" -u "s3upload" -p
Start off by creating three collections (tables).
db.createCollection( 'fileTypes', {} )
db.createCollection( 'files', {} )
db.createCollection( 'origins', {} )
Next, we’ll create two “fileType” documents (rows). Each file type document will control how the application will classify, filter, and upload files. You’ll see how these are used later on.
db.fileTypes.insertOne(
	{
		"type": "book",
		"text": "Books",
        "help": "Books must me in PDF format.",
		"extensions": [ "pdf" ],
		"mimetypes": [ "application/pdf" ],
		"bucket":"foo.ryanwendel.com.com",
		"path":"books"
	}
)

db.fileTypes.insertOne(
	{
		"type": "image",
		"text": "Images",
        "help": "Images must be in JPG, JPEG, PNG, or GIF format.",
		"extensions": [ "jpg", "jpeg", "png", "gif" ],
		"mimetypes": [ "image/jpeg", "image/png", "image/gif" ],
		"bucket":"bar.ryanwendel.com.com",
		"path":"files/images"
	}
)
We’ll also create an “origin” document that we’ll use to programmatically configure the CORS policy for the back-end API. Nope, we’re not setting a wildcard and walking away. Remember to abide by the Principle of Least Privilege!
db.origins.insertOne(
	{
		"origin": "http://192.168.0.160:3000"
	}
)
This document implies that my front-end’s origin is “http://192.168.0.160:3000” and that we want the back-end to allow this origin to read its responses. Check out the Same Origin Policy if you don’t understand this.
With our database set up, we’ll now focus on the back-end API. After installing Node, create a working directory for the back-end api. Traverse into this directory and run the following to set up your environment.
npm init -y

# Install the Fastify web framework stuffs
npm install fastify --save
npm install fastify-multipart --save
npm install fastify-cors --save

# Install the Mongoose library stuffs
npm install mongoose --save

# We want to read info from .env file
# so install the dotenv stuffs
npm install dotenv --save

# We'd like nodemon to restart our
# application automatically
npm install nodemon --save

# And lastly, install the AWS S3 stuffs
npm install @aws-sdk/client-s3 --save
npm install @aws-sdk/s3-request-presigner --save
All of this should be pretty self-explanatory. If not, visit some of the following links to read up on each package.
https://www.npmjs.com/package/fastify
https://www.npmjs.com/package/fastify-multipart
https://www.npmjs.com/package/fastify-cors
https://www.npmjs.com/package/mongoose
https://www.npmjs.com/package/dotenv
https://www.npmjs.com/package/nodemon
https://www.npmjs.com/package/@aws-sdk/client-s3
https://www.npmjs.com/package/@aws-sdk/s3-request-presigner
I could have installed the entire @aws-sdk package, but seeing as how everyone likes leaner/faster code, I chose to only install the portions of the SDK that we plan on using. Perhaps we could call this the Principle of Least Stuffs?
A quick note about “nodemon”.
nodemon is a tool that helps develop node.js based applications by automatically restarting the node application when file changes in the directory are detected.
To set up nodemon, we need to add the following line of code to our package.json file, in the scripts object:
"start": "./node_modules/nodemon/bin/nodemon.js ./src/index.js",
Your package.json file should end up looking something like the following:
{
  "name": "s3upload",
  "version": "1.0.0",
  "description": "",
  "main": "index.js",
  "scripts": {
    "start": "./node_modules/nodemon/bin/nodemon.js ./index.js",
    "test": "echo \"Error: no test specified\" && exit 1"
  },
  "keywords": [],
  "author": "",
  "license": "ISC",
  "dependencies": {
    "@aws-sdk/client-s3": "^3.3.0",
    "@aws-sdk/s3-request-presigner": "^3.3.0",
    "dotenv": "^8.2.0",
    "fastify": "^3.11.0",
    "fastify-cors": "^5.2.0",
    "fastify-multipart": "^3.3.1",
    "mongoose": "^5.11.13",
    "nodemon": "^2.0.7"
  }
}
Now after issuing an “npm start” in the root directory of your project, nodemon will automatically restart node when any of your files change.
Note: Do not use nodemon in production.
From here we’ll get into the code utilized by the back-end. To start, we’ll look at index.js and pulling in modules required by the application. The added comments should suffice regarding the reasons behind inclusion.
// file-system object used to read temp upload file
const fs = require('fs');

// keep a util object handy to dump objects
const util = require('util');
//console.log(util.inspect(error, {depth: null}))

// grab our env variables from .env file
const dotenv = require('dotenv');
dotenv.config();

// Import the fastify framework stuffs
const fastify = require('fastify');

// only load what we need from the AWS SDK S3 client
// https://docs.aws.amazon.com/AWSJavaScriptSDK/latest/AWS/S3.html
const { S3Client,
    GetObjectCommand,
    PutObjectCommand,
    DeleteObjectCommand,
    HeadObjectCommand
} = require('@aws-sdk/client-s3')

// only load the S3 getSignedUrl method
const { getSignedUrl } = require('@aws-sdk/s3-request-presigner');

// Pull in mongoose library to interact with MongoDB
const mongoose = require('mongoose');
Worth mentioning is the “dotenv” module. This allows you to place variables in a “.env” file in the root of your project that will store environment variables to use in your code. This provides portability and some added security in that we’re not hard-coding secrets in our code-base. Read up on using dotenv at the following URL.
Make note that you probably don’t want to include this in any git commits. Best to add it to your gitignore file. Check out the following URL for more info.
http://git-scm.com/docs/gitignore
My .env file looks like the following:
AWS_ACCESS_KEY_ID=AKIAFOOBARBBQ
AWS_SECRET_ACCESS_KEY=n6EVcZerFOOBARBBQ
AWS_REGION=us-east-2
MONGO_HOST=127.0.0.1
MONGO_PORT=27017
MONGO_DATABASE=s3upload
MONGO_USERNAME=s3upload
MONGO_PASSWORD=S3UploadBBQ
Next, in our index file we’ll pull in our environment variables, instantiate a Fastify object, register the multipart module, and create an object to interact with the AWS S3 service.
//---------------------------------------------------------
// Pull in our environment variables
//---------------------------------------------------------
dotenv.config();

//---------------------------------------------------------
// Create and configure our fastify object
//---------------------------------------------------------
const app = fastify()

// using fastify multipart for upload
// https://github.com/fastify/fastify-multipart
app.register(require('fastify-multipart'), {
    limits: {
      fileSize: 1 * 1024 * 1024,       // For multipart forms, the max file size
      files: 1                         // Max number of file fields
    }
  });

//---------------------------------------------------------
// Create an S3 client object
//---------------------------------------------------------
const s3 = new S3Client();
Then we’ll connect to the MongoDB we set up earlier. Note how we’re pulling in environment variables.
//---------------------------------------------------------
// Setup MongoDB connection
//---------------------------------------------------------
const mongoHost = process.env.MONGO_HOST;
const mongoPort = process.env.MONGO_PORT;
const mongoDatabase = process.env.MONGO_DATABASE;
const mongoUsername = process.env.MONGO_USERNAME;
const mongoPassword = process.env.MONGO_PASSWORD;

// Connect to DB
mongoose.connect('mongodb://' + mongoUsername + ':' + mongoPassword + '@' + mongoHost + ':' +mongoPort + '/' + mongoDatabase, {useNewUrlParser: true, useUnifiedTopology: true})
    .then(() => console.log('MongoDB connected...'))
    .catch(error =>; console.log(error));
Next, we pull in our controllers which also encompass our database models.
//---------------------------------------------------------
// Include our controllers
//---------------------------------------------------------
const fileController = require('./src/controllers/fileController.js');
const fileTypeController = require('./src/controllers/fileTypeController.js');
const originController = require('./src/controllers/originController.js');
It’s here that I should point out that database models were placed in “./src/models” and the logic that controls them is found in “./src/controllers”. The controllers include the models. By including the controllers in our index file we also pull in the models.
Take a quick look at the “file” model (./src/models/file.js).
// External Dependancies
const mongoose = require('mongoose')

const filesSchema = new mongoose.Schema({
    type: String,
    name: String,
    description: String,
}, { collection: 'files', versionKey: false })

module.exports = mongoose.model('File', filesSchema)
This is pretty straight forward. We define a schema that we want Mongoose to work with. The “versionKey” attribute tells Mongoose whether we want to keep track of versions within the database. This was not required for this POC.
Next, we’ll take a quick look at the file controller (./src/controllers/fileController.js).
// Get file model
const File = require('../models/file.js');

exports.getFile = async (id) => {
    // could use to sanitize id
    try {
        const file = await File.findById(id).lean();
        return file;
    } catch (error) {
        console.log(error);
    }
}

exports.getFiles = async () => {
    try {
        const files = await File.find().lean().sort({name: 1});
        return files;
    } catch (error) {
        console.log(error);
    }
}

exports.newFile = async (json) => {
    // probably need some sanitizing to
    // take place right about here
    try {
        const file = new File(json);
        return file.save();
    } catch (error) {
        console.log(error);
    }
}

exports.updateFile = async (id, json) => {
    // probably need some sanitizing to
    // take place right about here
    try {
        const file = json;
        const { ...updateData } = file;
        const update = await File.findByIdAndUpdate(id, updateData, { new: true, useFindAndModify: false});
        return update;
    } catch (error) {
        console.log(error);
    }
}

exports.deleteFile = async (id) => {
    // could use to sanitize id
    try {
        const file = await File.findByIdAndRemove(id, { useFindAndModify: false });
        return file;
    } catch (error) {
        console.log(error);
    }
}
Everything should also be pretty self-explanatory. We’re creating functions to get, create, update, and delete file objects.
The “fileType” model/controller are very similar. The “origin” model and controller were dumbed down in that I needed something simple to pull origins from the database to help configure CORS. Regardless, there is a lot of overlap between all of them.
At this point, we go back to our index file and work on handling the routes our API will work with. They are as follows:
# The apex (base) route (prints "Hello world")
# METHOD: GET
/

# Gets a single file from the database
# Ingests a query string "id" parameter
# METHOD: GET
/getFile

# Gets all files from the database
# METHOD: GET
/getFiles

# Creates a file (only interacts with the database and is not used by
# the front-end)
# Ingests a JSON file object. Requires all key-values pairs of a file object.
# METHOD: POST
/newFile

# Deletes a file (deletes a file from the database and S3)
# Ingests either a JSON object with an "id" name-value pair in the request
# body or an id query string parameter
# METHOD: DELETE
/deleteFile

# Updates a file (only interacts with the database and is not used by
# the front-end)
# Ingests a JSON object in the request body. Requires all key-value pairs
# of a file object and an "id" value
# METHOD: PUT
/updateFile

# Ceates a file in the database and uploads the object to S3
# Ingests data from a multipart form. Requires a multipart file, file
# type, and description.
# METHOD: POST
/uploadFile

# Gets a file type from the database
# Ingests a query string "id" parameter
# METHOD: GET
/getFileType

# Gets all file types from the database
# METHOD: GET
/getFileTypes

# Create a file type (only interacts with the database and is not used
# by the front-end)
# Ingests a JSON object in the request body. Requires all key-value pairs
# of a file type object.
# METHOD: POST
/newFileType

# Updates a file type (only interacts with the database and is not used
# by the front-end)
# Ingests a JSON object in the request body. Requires all key-value pairs
# of a file type object and an "id" value.
# METHOD: PUT
/updateFileType

# Creates a pre-signed URL from S3 that allows for the download of a file
# Ingests a query string "id" parameter
# METHOD: GET
/getUrl
I won’t go over every piece of code that comprises each route and, instead, will choose to highlight various fragments.
The following is some logic I utilized to sanity check inputs for the “/newFileType” route. It’s always prudent to handle erroneous input gracefully and provide some meaningful feedback to help with debugging.
// sanity checking
if(!request.body.type) {
	reply.code(400).send('{ "message":"Please provide file type" }');
	return;
} else if(!request.body.text) {
	reply.code(400).send('{ "message":"Please provide file text" }');
	return;
} else if(!request.body.help) {
	reply.code(400).send('{ "message":"Please provide file help" }');
	return;
} else if(!request.body.mimetypes) {
	reply.code(400).send('{ "message":"Please provide mimetypes" }');
	return;
} else if(!request.body.extensions) {
	reply.code(400).send('{ "message":"Please provide extensions" }');
	return;
} else if(!request.body.bucket) {
	reply.code(400).send('{ "message":"Please provide bucket" }');
	return;
} else if(!request.body.path) {
	reply.code(400).send('{ "message":"Please provide bucket path" }');
	return;
}
You’ll see several variations of this throughout the route logic. Perhaps some slick Node package exists to perform this task more gracefully. I didn’t look for one but wouldn’t be surprised if someone has already put something together.
There is also some sanity checking done with regards to uploaded files and their file type information. The back-end API makes sure that the mime-type and extensions specified in fileType objects are adhered to.
// grab the file type info
const fileTypes = await fileTypeController.getFileTypes();

// grab our allowed types array
const allowedTypes = buildAllowedFileTypes(fileTypes);

// grab our type info
const typeInfo = getTypeInfo(fileType, fileTypes);

// do we have a legit file type?
if(!allowedTypes.includes(fileType)) {
	reply.code(400).send('{ "message":"Incorrect file type" }');
	return;
}

// check if file extension is legit
if(!typeInfo.extensions.includes(fileExtension)) {
	reply.code(400).send('{ "message":"File extension does not match the chosen file type" }');
	return;
}

// check if mimetype is legit
if(!typeInfo.mimetypes.includes(fileMimeType)) {
	reply.code(400).send('{ "message":"Incorrect file format" }');
	return;
}
The following is how a file is inserted into the database. We use the “fileController” object to call the “newFile” method to insert a document/row into the “files” collection/table.
// create an object to insert into the database
const newFile = JSON.parse('{ "type":"' + fileType + '", "name":"' + fileName + '", "description":"' + fileDescription + '" }');

// insert the new file into the database
try {
	const inserted = fileController.newFile(newFile);
	console.log("Insert success", inserted);
	reply.code(200).send('{ "message":"File upload was successful" }');
	return;
} catch (error) {
	console.log("Error", error);
	reply.code(500).send('{ "message":"File uploaded to S3 but database insert failed" }');
	return;
}
The insertion of the file document into the files collection is preceded by parsing the uploaded multipart file and uploading it to the file type’s specific S3 bucket. Note that this code checks to see if an object with the same S3 “key” already exists and bails if this is the case.
// temporarily save the file to the tmp directory
const files = await request.saveRequestFiles();

// save some vars to make thing easier
const fileType			= files[0].fields.fileType.value;
const fileDescription	= files[0].fields.description.value;
const filePath			= files[0].filepath;
const fileName			= files[0].filename;
const fileMimeType		= files[0].mimetype;
const fileExtension		= fileName.split('.').pop();

[TRUNCATED]

// Set the parameters
const headParams = {
	"Bucket": typeInfo.bucket,
	"Key": typeInfo.path + "/" + fileName
};

// check if the S3 object already exists
try {
	const headCheck = await s3.send(new HeadObjectCommand(headParams));
	console.log('File already exists in S3');
	reply.code(403).send('{ "message":"This file already exists in S3" }');
	return;
} catch (error) {
	console.log('Head check passed. Proceeding with upload.');
}

// read in the file's contents
const fileBody = fs.createReadStream(filePath)

fileBody.on("error", function (error) {
	console.log("File Error", error);
	reply.code(500).send('{ "message":"Problem with uploaded file" }');
	return;
});

// Set the parameters
const uploadParams = {
	"Bucket": typeInfo.bucket,
	"Key": typeInfo.path + "/" + fileName,
	"ContentType": fileMimeType,
	"Body": ""
};

// no idea why we couldn't set this in the previous declaration ¯\_(ツ)_/¯
uploadParams.Body = fileBody;

// upload the file to S3
try {
	// call S3 to upload book to specified bucket
	const data = await s3.send(new PutObjectCommand(uploadParams));
	console.log("Upload success", data);
} catch (error) {
	console.log("Error", error);
	reply.code(500).send('{ "message":"File upload to S3 failed" }');
	return;
}
And then there is the task of obtaining a pre-signed URL from the S3 service.
// Set the parameters
const params = {
	"Bucket": typeInfo.bucket,
	"Key": typeInfo.path + "/" + fileName
}

[TRUNCATED]

// call S3 to create presigned url
try {
	const url  = await getSignedUrl(s3, new GetObjectCommand(params), { expiresIn: 5 * 60 })
	console.log("Success", url);
	reply.code(200).send('{ "url":"' + url + '" }');
	return
} catch (error) {
	console.log("Error", error);
	reply.code(500).send('{ "message":"Cannot create url" }');
	return
}
And lastly (regarding the back-end’s index file), we have to handle CORS so that the foreign origin of the front-end can read the responses provided by the back-end API. The lazy way to handle this is to set a wild-card but I strongly urge against this. Again, abide by the Principle of Least Privilege and only allow approved origins to read responses from any API you create. Granted, unless you want to open your API up to the world.
I handled the CORS configuration and started the Fastify application in the following manner. Figuring this out was kind of a pain-in-the-ass. Perhaps someone out there knows a more elegant way to handle this?
// build the origin list first
originController.getOrigins().then(function(origins) {
    let originList = [];
    for(i = 0; i < origins.length; i++) {
        originList.push(origins[i].origin);
    }

    // handle CORS configuration
    app.register(require('fastify-cors'), {
        origin: originList,
        methods: [ 'GET', 'PUT', 'POST', 'DELETE' ],
        allowerdHeaders: [ 'Content-Type', 'Origin', 'Accept' ],
        credentials: true
    })

    // Start the server
    app.listen(8000, '192.168.0.160', function (error, address) {
        if (error) {
            console.error(error);
            process.exit(1);
        }
        console.log(`Server listening on ${address}`);
    })

}).catch(function(error) {
    console.log("Error", error);
})
And now we’re on to the React front-end. As far as React goes, the main points I took from this front-end technology were:
- JSX and components
- State and lifecycle
- Handling events
- How require and exports work
- Promises returned by asynchronous operations
Great links to read up on React are:
https://reactjs.org/docs/
https://react-tutorial.app
Admittedly, I could learn to use components and props better than I did. Always room for improvement!
I’m not going to go over everything I did in the front-end as coming to understand React is something a lot of online resources already deal with. Tons of publicly available info exist that can help you with this.
What I will detail is constructing some of the upload form via use of back-end API calls and how the upload form is used to transmit files to the back-end.
Let’s first create our application’s environment. Execute the following as non-root user.
npx create-react-app reactui
cd reactui
npm install axios --save
npm install dotenv --save
To start, we’ll look at the select object that helps build form data to send to the back-end to communicate what file type is being uploaded. Various member variables need to be initialized in the app’s constructor to help out with this.
Take a look at the app’s constructor.
constructor(props) {
	super(props);

	// grab our environment vars
	dotenv.config();

	// set "the state" (great old school show, btw)
	this.state = {
		apiUrl: 'http://' + process.env.REACT_APP_UPLOAD_API_HOST + ':' + process.env.REACT_APP_UPLOAD_API_PORT,
		fileTypeSelectOptions: [],
		fileTypeSelectOptionsValue: 0,
		fileTypeInfo: [],
		selectedFile: '',
		fileTypeHelp: '',
		fileTable: [],
		statusElement: '',
		uploadTable: []
	};
}
Also, note the use of “dotenv” to assist with making the back-end API portable. My .env file was pretty simple.
REACT_APP_UPLOAD_API_HOST=192.168.0.160
REACT_APP_UPLOAD_API_PORT=8000
As far as dynamically building a select element goes, I used the “fileTypeSelectOptions”, “fileTypeSelectOptionsValue”, and “fileTypeInfo” member variables for this. Let’s look at how this went down.
When fetching data needed to help construct objects for an interface, it’s best to do so in the “componentDidMount” lifecycle event. Without going off on a tangent about why this is optimal, go ahead and peruse the following link for specifics. Dave does a good job at explaining why this is.
https://daveceddia.com/where-fetch-data-componentwillmount-vs-componentdidmount/
And now on to mine:
componentDidMount() {
	// grab our file type info
	axios.get(this.state.apiUrl + '/getFileTypes').then(response => {
		const data = response.data.data;
		this.setState({ fileTypeInfo: data });
		this.setState({ fileTypeHelp: data[this.state.fileTypeSelectOptionsValue].help });
	}).catch(response => {
		if(!response.data) {
			this.setState({ statusElement: <div id='Status' className='alert alert-danger'>Problem accessing back-end</div>});
		} else {
			this.setState({ statusElement: <div id='Status' className='alert alert-danger'>{response.data.message}</div>});
		}
	});

	// grab list of files and build our table
	this.setFilesTable();
}
Something to note, the “Axios” HTTP client is being utilized by the front-end application to make API calls to the back-end.
The “componentDidMount” lifecycle event encompasses making a call to the back-end “/getFileTypes” endpoint and setting a few state variables. The file type info gets stored in “fileTypeInfo” while “fileTypeHelp” stores some text designated by the “fileTypeSelectOptionsValue” integer.
With the file type info captured and available for repeated use in other portions of the app, a call to “setFileTable” is made that builds a list of files already uploaded to S3 that allows a user to download or delete each file. This list of files gets stored in a state variable as we want to re-render the list when a file is deleted. State variables are utilized for this purpose.
Note that we make use of the “setState” function instead of returning a React Component. React has a pretty slick convention for handling an application’s state. A call to “setState” that updates an app’s state-specific member variables will force a call to “render()” which will utilize the updated state variables and rebuild the DOM.
setFilesTable = () => {
	// grab list of files and build a table
	axios.get(this.state.apiUrl + '/getFiles').then(response => {
		const data = response.data.data;
		const tableRows = [];

		for(let i = 0; i < data.length; i++) {
			tableRows.push(<tr key={i}>
					<td>{data[i].name}</td>
					<td>{data[i].description}</td>
					<td className='Download-Column'>
						<button className='btn btn-success btn-sm' onClick={this.onDownloadClick.bind(this, data[i]._id)}>
							<span></span> Download
						</button>
					</td>
					<td className='Delete-Column'>
						<button className='btn btn-danger btn-sm' onClick={this.onDeleteClick.bind(this, data[i]._id)}>
							<span></span> Delete
						</button>
					</td>
				</tr>
			);
		}

		const fileTable = <table className='table table-hover table-bordered table-striped m-t-15px'>
			<tbody>
				{tableRows}
			</tbody>
		</table>;

		this.setState({ fileTable: fileTable });
	}).catch(response => {
		if(!response.data) {
			this.setState({ statusElement: <div id='Status' className='alert alert-danger'>Problem accessing back-end</div>});
		} else {
			this.setState({ statusElement: <div id='Status' className='alert alert-danger'>{response.data.message}</div>});
		}
	});
}
The “setFilesTable” method makes a call to the “/getFiles” back-end API target whose response is then used to build a table of files. Handlers are attached to two buttons that handle the downloading and deletion of files. Both handlers are very similar in that they ingest a file ID to use when making calls to the back-end.
Take a look at the download handler.
onDownloadClick = (id, event) => {
	//axios.get(this.state.apiUrl + '/getUrl?id=' + event.target.dataset.id).then(response => {
	axios.get(this.state.apiUrl + '/getUrl?id=' + id).then(response => {
		window.open(response.data.url, '_blank', 'noopener,noreferrer')
	}).catch(response => {
		if(!response.data) {
			this.setState({ statusElement: <div id='Status' className='alert alert-danger'>Problem accessing back-end</div>});
		} else {
			this.setState({ statusElement: <div id='Status' className='alert alert-danger'>{response.data.message}</div>});
		}
	});
}
Pretty straight-forward. The “onDownloadClick” handler makes a call to the back-end to obtain a pre-signed URL from S3 and opens a new window using the generated URL.
I haven’t featured it here, but I chose to send JSON to the delete handler simply because I wanted to work through using both scenarios of using query parameters and a request body. You can see the query parameter version commented out in the code-base.
Now on to how the upload form is utilized to transmit files to the back-end.
Go back to the constructor and make note of the “selectedFile” member variable. This is the object that will comprise the file that will eventually be uploaded to S3. A file input is tied to this state variable via the “onFileChange” handler.
<input type='file' className='form-control' onChange={this.onFileChange.bind(this)} required />
The “onFileChange” handler simply sets the “selectedFile” state variable.
// On file select (from the pop up)
onFileChange = event => {
	// Update the state
	this.setState({ selectedFile: event.target.files[0] });
};
The upload button calls another handler that performs the actual upload.
<button type='button' className='btn btn-primary' onClick={this.onSubmit.bind(this)}>
	<span></span> Upload File
</button>
Take a look at the “onSubmit” class method. The provided comments should be self-explanatory.
// On file upload (click the upload button)
onSubmit = event => {
	// Was the fileTypeInfo state populated?
	if(!this.state.fileTypeInfo[this.state.fileTypeSelectOptionsValue]) {
		this.setState({ statusElement: <div id='Status' className='alert alert-danger'>Missing file type info</div>});
		return;
	}

	// was a file selected?
	if(!this.state.selectedFile.name) {
		this.setState({ statusElement: <div id='Status' className='alert alert-danger'>Please select a file to upload</div>});
		return;
	}

	// Create a formData object to help transmit our file
	const formData = new FormData();

	// Append the file to the formData object
	formData.append(
		"file",
		this.state.selectedFile,
		this.state.selectedFile.name
	);

	// append the file type to the formData object
	formData.append(
		"fileType",
		this.state.fileTypeInfo[this.state.fileTypeSelectOptionsValue].type
	);

	// append the file description to the formData object
	formData.append(
		"description",
		this.state.description
	);

	// Make the request to the backend api
	axios.post(this.state.apiUrl + '/uploadFile', formData).then(response => {
		this.setState({ statusElement: <div id='Status' className='alert alert-success'>{response.data.message}</div>});

		// refresh the files table
		this.setFilesTable();
	}).catch(response => {
		if(!response.response) {
			this.setState({ statusElement: <div id='Status' className='alert alert-danger'>Problem accessing back-end</div>});
		} else {
			this.setState({ statusElement: <div id='Status' className='alert alert-danger'>{response.response.data.message}</div>});
		}
	});
};
The “onSubmit” method uses various state variables to construct a form object that is used to post the file to the “/uploadFile” endpoint. Pretty easy after it’s all said and done.
There is definitely some room for improvement within my little proof-of-concept. Granted, I’m not too concerned with going much further with any of the coding as I want to push on to other tasks. I plan on using this code-base for at least two more blog posts that encompass CI/CD pipelines. One using AWS’ CodeCommit as a starting point and another that works with ECR after I push this entire project into containers. I plan to integrate both with BeanStalk with the former using EC2 instances and the latter ECS. Stay tuned!