Building off my last post, I wanted to utilize the simple application I created in another proof-of-concept that involves the following AWS technologies:
- Elastic Cloud Compute Instances (EC2)
- EC2 Autoscaling Groups
- Network automation via Cloudformation
- CodePipeline
- CodeCommmit
- CodeDeploy
The gist of this new proof-of-concept involves wrapping my head around creating a modern cloud application environment and applying the principles of Continous Integration and Continuous Deployment (CI/CD) to it.
To kick things off I want to start with the CloudFormation template I created that provisions and configures about 95% of this project. CloudFormation (CF) is tough and somewhat painful, but definitely something I am highly impressed with. Being able to provision my environment in just a few short minutes and tear it down even quicker is pretty slick. In total, I didn’t spend over $6 working through this POC because of the effort I put into my CF template. The bulk of the time spent on this project was focused on CloudFormation. Something I didn’t expect seeing as how I had already worked with CF quite a bit in the past.
My CF template spins up a highly available Virtual Private Cloud (VPC) that spans two Availability Zones (AZ) and features three separate subnets per AZ. This ended up looking like the following:

This template can be found in the root of the GitHub repo that accompanies this post.
Some things to note:
- I did not configure a highly available MongoDB cluster
- The bastion lives in a third subnet, has its own Elastic IP (EIP), and routes through the main Internet Gateway (IGW)
- I only configured a single NAT Gateway due to cost issues
- The React front-end from my last blog post is hosted in S3
I’ll definitely be looking at MongoDB’s high availability features in the future. Perhaps I’ll blog about it, but I imagine there are numerous posts in existence already. I doubt we need another.
Instances are protected by Security Groups (SG). I left the Network Access Control Lists (NACL) wide open but highly recommend implementing the Principle of Least Privilege by locking these down to what is needed by each subnet in terms of traffic flow. I may circle back and update these along with this post.
Other features I’d like to highlight are as follows.
The EC2 Instance Profile that grants launched instances the permissions needed to access “all the things” was a pain-in-the-ass to put together. I worked it out by referencing logs and sheer power-of-will but I do believe I need to deep-dive CloudTrail to get a better grip on troubleshooting IAM access issues. Regardless, the Instance Profile allows for launched instances to do the following:
- Assume a role
- Interact with the CloudWatch logging facility in order to capture CF logs
- Interact with the S3 service to allow the Node API to upload, download, and delete objects
- Interact with the S3 service to allow CodeDeploy to download deployment bundles
- Interact with the EC2 service to allow an instance to tag itself
- Interact with an Elastic Load Balancer (ELB) to allow for registration and deregistration
- Interact with an AutoScaling Group (ASG) to allow for the suspension of scaling activities during a deployment
I am glossing over a good bit with these descriptions but this is the gist of what an instance requires to work through a CodeDeploy “deployment”. Take a look at the following CF template snippet to see how this played out. I tried my best to implement the Principle of Least Privilege when creating this instance profile.
Make note of the highlighted lines. These are the two S3 buckets the back-end application uses to upload/download objects. We’ll talk more about these soon.
  InstanceRole:
    Type: 'AWS::IAM::Role'
    DependsOn:
      - CodeBucket
      - LoadBalancer1
    Properties:
      AssumeRolePolicyDocument:
        Version: '2012-10-17'
        Statement:
          - Effect: Allow
            Principal:
              Service:
                -  ec2.amazonaws.com
            Action:
              - 'sts:AssumeRole'
      Path: /
      Policies:
        - PolicyName: LogPolicy
          PolicyDocument:
            Version: '2012-10-17'
            Statement:
              - Effect: Allow
                Action:
                  - 'logs:CreateLogGroup'
                  - 'logs:CreateLogStream'
                  - 'logs:PutLogEvents'
                  - 'logs:DescribeLogStreams'
                Resource:
                  - !Sub 'arn:aws:logs:${AWS::Region}:${AWS::AccountId}:*'
        - PolicyName: S3AppPolicy
          PolicyDocument:
            Version: '2012-10-17'
            Statement:
              - Effect: Allow
                Action:
                  - 's3:GetObject'
                  - 's3:PutObject'
                  - 's3:PutObjectAcl'
                  - 's3:DeleteObject'
                Resource:
                  - 'arn:aws:s3:::foo.ryanwendel.com/books/*'
                  - 'arn:aws:s3:::bar.ryanwendel.com/files/images/*'
        - PolicyName: S3CodePolicy
          PolicyDocument:
            Version: '2012-10-17'
            Statement:
              - Effect: Allow
                Action:
                  - 's3:GetObject'
                  - 's3:GetObjectVersion'
                  - 's3:ListBucket'
                Resource:
                  - !Sub
                    - '${BucketArn}/*'
                    - { BucketArn: !GetAtt CodeBucket.Arn }
        - PolicyName: EC2Policy
          PolicyDocument:
            Version: '2012-10-17'
            Statement:
              - Effect: Allow
                Action:
                  - 'ec2:CreateTags'
                Resource:
                  - !Sub 'arn:aws:ec2:${AWS::Region}:${AWS::AccountId}:*/*'
        - PolicyName: ELBPolicy
          PolicyDocument:
            Version: '2012-10-17'
            Statement:
              - Effect: Allow
                Action:
                  - 'elasticloadbalancing:DescribeTargetGroupAttributes'
                  - 'elasticloadbalancing:DescribeTargetGroups'
                  - 'elasticloadbalancing:DescribeTargetHealth'
                  - 'elasticloadbalancing:DeregisterTargets'
                  - 'elasticloadbalancing:RegisterTargets'
                Resource:
                  - !Ref LoadBalancer1
        - PolicyName: ASGPolicy1
          PolicyDocument:
            Version: '2012-10-17'
            Statement:
              - Effect: Allow
                Action:
                  - 'autoscaling:DescribeAutoScalingInstances'
                  - 'autoscaling:DescribeAutoScalingGroups'
                Resource:
                  - '*'
        - PolicyName: ASGPolicy2
          PolicyDocument:
            Version: '2012-10-17'
            Statement:
              - Effect: Allow
                Action:
                  - 'autoscaling:EnterStandby'
                  - 'autoscaling:ExitStandby'
                  - 'autoscaling:UpdateAutoScalingGroup'
                  - 'autoscaling:SuspendProcesses'
                  - 'autoscaling:ResumeProcesses'
                Resource:
                  - !Sub 'arn:aws:autoscaling:${AWS::Region}:${AWS::AccountId}:autoScalingGroup:*:autoScalingGroupName/${NamingPrefix}*'
The first of the two buckets created by the CF stack allows CodePipeline to store deployment bundles, while the second is used to host the React front-end. The latter allows public access and is configured for use as a website.
Two instances are launches outside of the main ASG; one that acts as a Bastion host while another provides the application servers a back-end MongoDB database. The MongoDB instance autoconfigures itself via its UserData script.
I ended up base64 encoding some of the Mongo instance’s UserData text to make portability and configuration easier. It ended up looking like the following:
#!/bin/bash -xe
echo -n 'W21vbmdvZGItb3JnLTQuNF0KbmFtZT1Nb25nb0RCIFJlcG9zaXRvcnkKYmFzZXVybD1odHRwczovL3JlcG8ubW9uZ29kYi5vcmcveXVtL2FtYXpvbi8yL21vbmdvZGItb3JnLzQuNC94ODZfNjQvCmdwZ2NoZWNrPTEKZW5hYmxlZD0xCmdwZ2tleT1odHRwczovL3d3dy5tb25nb2RiLm9yZy9zdGF0aWMvcGdwL3NlcnZlci00LjQuYXNjCg==' | base64 -d > /etc/yum.repos.d/mongodb-org.repo
yum install -y htop mongodb-org
# Make MongoDB listen on all interfaces
sed -i 's/bindIp: 127.0.0.1/bindIp: 0.0.0.0/' /etc/mongod.conf
# Enable and start MongoDB
systemctl enable mongod
systemctl start mongod
# Create Mongo collections and insert a few documents
echo 'dXNlIHMzdXBsb2FkCmRiLmNyZWF0ZUNvbGxlY3Rpb24oICdmaWxlVHlwZXMnLCB7fSApCmRiLmNyZWF0ZUNvbGxlY3Rpb24oICdmaWxlcycsIHt9ICkKZGIuY3JlYXRlQ29sbGVjdGlvbiggJ29yaWdpbnMnLCB7fSApCmRiLmZpbGVUeXBlcy5pbnNlcnRPbmUoewogICAgICAgICJ0eXBlIjogImJvb2siLAogICAgICAgICJ0ZXh0IjogIkJvb2tzIiwKICAgICAgICAiaGVscCI6ICJCb29rcyBtdXN0IG1lIGluIFBERiBmb3JtYXQuIE1heCBmaWxlIHNpemUgaXMgMU1CLiIsCiAgICAgICAgImV4dGVuc2lvbnMiOiBbICJwZGYiIF0sCiAgICAgICAgIm1pbWV0eXBlcyI6IFsgImFwcGxpY2F0aW9uL3BkZiIgXSwKICAgICAgICAiYnVja2V0IjoiZm9vLnJ5YW53ZW5kZWwuY29tIiwKICAgICAgICAicGF0aCI6ImJvb2tzIgogICAgfQopCmRiLmZpbGVUeXBlcy5pbnNlcnRPbmUoewogICAgICAgICJ0eXBlIjogImltYWdlIiwKICAgICAgICAidGV4dCI6ICJJbWFnZXMiLAogICAgICAgICJoZWxwIjogIkltYWdlcyBtdXN0IGJlIGluIEpQRywgSlBFRywgUE5HLCBvciBHSUYgZm9ybWF0LiBNYXggZmlsZSBzaXplIGlzIDFNQi4iLAogICAgICAgICJleHRlbnNpb25zIjogWyAianBnIiwgImpwZWciLCAicG5nIiwgImdpZiIgXSwKICAgICAgICAibWltZXR5cGVzIjogWyAiaW1hZ2UvanBlZyIsICJpbWFnZS9wbmciLCAiaW1hZ2UvZ2lmIiBdLAogICAgICAgICJidWNrZXQiOiJiYXIucnlhbndlbmRlbC5jb20iLAogICAgICAgICJwYXRoIjoiZmlsZXMvaW1hZ2VzIgogICAgfQopCg==' | base64 -d | mongo
# Insert an origin document to help with CORS
echo -e 'use s3upload\ndb.origins.insertOne({"origin": "http://${WebBucketName}.s3-website.${AWS::Region}.amazonaws.com"})' | mongo
# Finish up by setting passwords on everything
echo 'dXNlIHMzdXBsb2FkCmRiLmNyZWF0ZVVzZXIoewogICAgICAgIHVzZXI6ICJzM3VwbG9hZCIsCiAgICAgICAgcHdkOiAiUzNVcGxvYWRCQlEiLAogICAgICAgIHJvbGVzOiBbIHsgcm9sZTogInJlYWRXcml0ZSIsIGRiOiAiczN1cGxvYWQiIH0gXQogICAgfQopCnVzZSBhZG1pbgpkYi5jcmVhdGVVc2VyKHsKICAgICAgICB1c2VyOiAicm9vdCIsCiAgICAgICAgcHdkOiAiQmFkUGFzc3dvcmQxMjMhIiwKICAgICAgICByb2xlczogWyB7IHJvbGU6ICJ1c2VyQWRtaW5BbnlEYXRhYmFzZSIsIGRiOiAiYWRtaW4iIH0sICJyZWFkV3JpdGVBbnlEYXRhYmFzZSIgXQogICAgfQopCg==' | base64 -d | mongo
# Enable security for MongoDB
echo -e 'security:\n    authorization: enabled' >> /etc/mongod.conf
# Restart MongoDB
systemctl restart mongod
Decoding the string after the comment “Create Mongo collections and insert a few documents” yields some commands fed to MongoDB that configure the back-end application’s “File Types”. If you are reproducing this, you will need to configure buckets in your AWS account and update this portion of the UserData.
Decoding the string after the comment “Finish up by setting passwords on everything” yields some commands that configure credentials for the MongoDB instance. These end up being placed in a “.env” file in the API’s CodeCommit repo.
Check out the following decoded block. Make note of the highlighted sections. If you don’t change these in your reproduction of this proof-of-concept, the back-end won’t be able to write to S3 buckets my account owns. Or at least it shouldn’t be able to. 😉
use s3upload
db.createCollection( 'fileTypes', {} )
db.createCollection( 'files', {} )
db.createCollection( 'origins', {} )
db.fileTypes.insertOne({
        "type": "book",
        "text": "Books",
        "help": "Books must me in PDF format. Max file size is 1MB.",
        "extensions": [ "pdf" ],
        "mimetypes": [ "application/pdf" ],
        "bucket":"foo.ryanwendel.com",
        "path":"books"
    }
)
db.fileTypes.insertOne({
        "type": "image",
        "text": "Images",
        "help": "Images must be in JPG, JPEG, PNG, or GIF format. Max file size is 1MB.",
        "extensions": [ "jpg", "jpeg", "png", "gif" ],
        "mimetypes": [ "image/jpeg", "image/png", "image/gif" ],
        "bucket":"bar.ryanwendel.com",
        "path":"files/images"
    }
)
As I used a collection to control CORS for the back-end API, I had to include a line that added an entry to allow for the ELB to read responses.
The relevant piece of code from the back-end is:
// build the origin list first
originController.getOrigins().then(function(origins) {
    let originList = [];
    for(i = 0; i < origins.length; i++) {
        originList.push(origins[i].origin);
    }

    // handle CORS configuration
    app.register(require('fastify-cors'), {
        origin: originList,
        methods: [ 'GET', 'PUT', 'POST', 'DELETE' ],
        allowerdHeaders: [ 'Content-Type', 'Origin', 'Accept' ],
        credentials: true
    })

[TRUNCATED]
The portion of the Mongo instance’s UserData script that inserts a document into the “origins” collections is:
echo -e 'use s3upload\ndb.origins.insertOne({"origin": "http://${WebBucketName}.s3-website.${AWS::Region}.amazonaws.com"})' | mongo
I worked in some other interesting instance-related configurations for members of the ASG. Each ASG instance launched has the following tasks applied.
- Cloudwatch logging agent installed and configured
- CodeDeploy agent installed and configured
- NodeJS installed with a “stub” server configured to start on TCP port 80
- UserData scripting to have instances tag themselves
During the Node installation portion of an instance’s launch, I opted for starting a simple HTTP Node server to make the ELB happy when it performed health checks. I could have installed the application on launch but wanted to experiment with CodeDeploy on instances without previous application installations.
There is also a Simple Notification Service (SNS) topic that will alert an email address of various autoscaling-related events. The following events are tied to notifications for instances launched by the ASG.
NotificationTypes:
  - 'autoscaling:EC2_INSTANCE_LAUNCH'
  - 'autoscaling:EC2_INSTANCE_LAUNCH_ERROR'
  - 'autoscaling:EC2_INSTANCE_TERMINATE'
  - 'autoscaling:EC2_INSTANCE_TERMINATE_ERROR'
Despite there being a lot more to unpack in my CF template, we’re going to move on. This post is supposed to be about learning how to use some of AWS’ CI/CD tools. I just wanted to point out some of the goodies I baked into my template.
At this point, let’s jump into creating our stack and move on with this experiment. Log on to the AWS console and access the CloudFormation service. Hit the “Create Stack” button and load up the “CodeDeploy POC.yml” file found in the root of my GitHub repo.
Hit next and work through the parameters. The only prerequisite for this template is having an SSH Key Pair. Make sure you have one configured already and work through the parameters. Most of the defaults should be fine. The only non-default values are:
- Stack Name
- NamingPrefix
- AvailabilityZone1
- AvailabilityZone2
- AvailabilityZoneBastion
- SafeNetwork
- KeyName
- CodeBucketName
- WebBucketName
- OperatorEmail
Make sure you fill these out prior to clicking next. No stack options are necessary. Click next. Make sure to tick the box for “I acknowledge that AWS CloudFormation might create IAM resources” on the final review page at the bottom before clicking next. This is alerting you to the fact that you’re configuring IAM permissions for something in the stack that could be used for malicious purposes. Principle of Least Privilege!
Once the stack is created you should see something like the following:
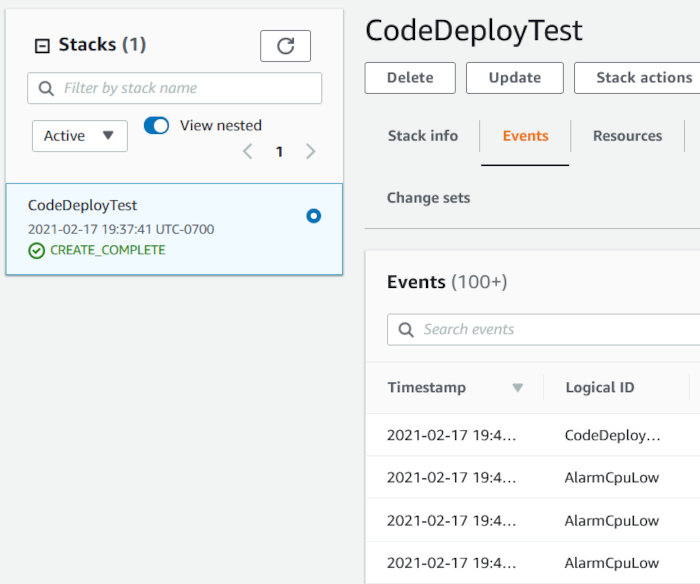
Click the “Outputs” tab and make note of some information my template alerts you to. We’ll be using this shortly.
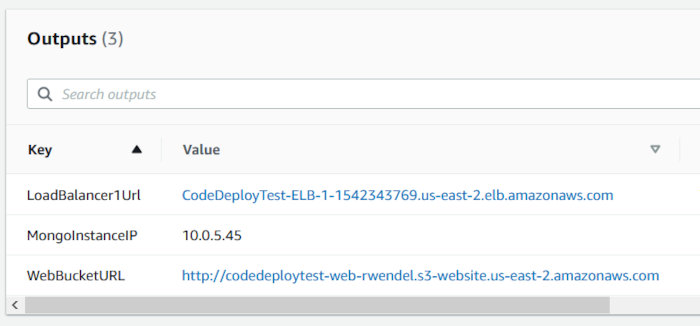
Let’s test the ELB hostname. Grab the URL pointed at by the “LoadBalancer1Url” CF output and make a request to it using curl. You should see the stub server response with “Server up”.
$ curl http://codedeploytest-elb-1-1542343769.us-east-2.elb.amazonaws.com/
Server up
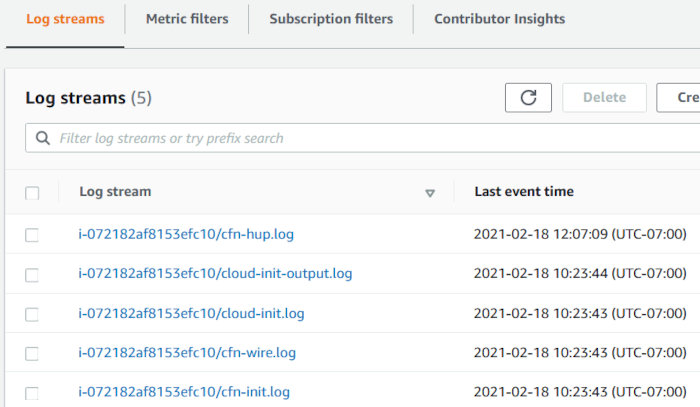
Check out the CF logs that are pushed into CloudWatch shortly after instance launch. I used info from the following AWS blog to help with this.
https://aws.amazon.com/blogs/devops/view-cloudformation-logs-in-the-console/

Now we’ll upload our React front-end. Hit my Github repo again and grab the “reactjs” folder and place it on a system with Node installed. Open up the “.env” file in the root of the directory and place only the hostname from the ELB URL in the parameter named “REACT_APP_UPLOAD_API_HOST”. It should end up looking like the following.
REACT_APP_UPLOAD_API_HOST=codedeploytest-elb-1-1542343769.us-east-2.elb.amazonaws.com
REACT_APP_UPLOAD_API_PORT=80
Run the following from the root of the “reactui” directory to create files we can use on a basic HTTP server.
npm run build
Once the command finishes, you should see something like the following:
> reactjs@0.1.0 build
> react-scripts build

Creating an optimized production build...
Compiled with warnings.

src/App.js
  Line 9:8:  'util' is assigned a value but never used  no-unused-vars

[TRUNCATED]
Something to note: Editing the .env file and then running build is pretty cumbersome. If this were a live production environment, I’d utilize something like Webpack’s Externals to pull in the parameter file as an external dependency at runtime. There is already enough going on in this proof-of-concept, so I decided to leave this part out.
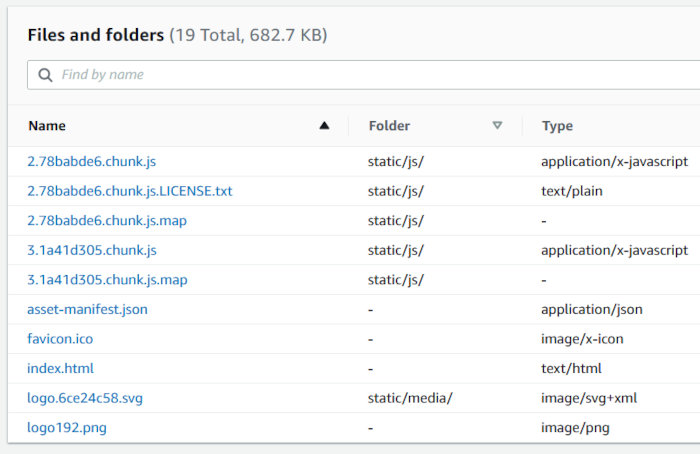
From here we’ll take the contents of the “build” directory we just created and upload it to the S3 bucket we created to store our React front-end. The one we configured with the “WebBucketName” CF parameter during stack creation. You should see something like the following after having uploaded everything. Make sure to include the “static” folder:
Once uploaded, grab the URL pointed at by the “WebBucketURL” CF output and open it in your browser. You should get an error that states “Problem accessing back-end”.

Not to worry. The front-end is reporting this error due to the fact that we haven’t deployed our application yet.
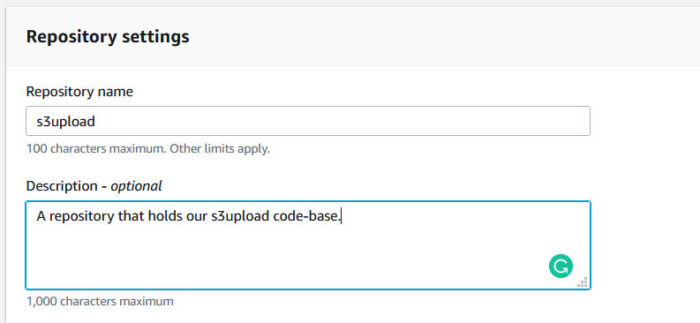
Now we need to create a CodeCommit Repository. Open up the CodeCommit service page in the AWS console and hit the “Create Repository” button and create a new repo.
Get on to the command line and execute the following to clone the empty repo you just created. The credentials used by the AWS CLI will require access to the newly created CodeCommit repo.
git config --global credential.helper '!aws codecommit credential-helper $@'
git config --global credential.UseHttpPath true
git clone https://git-codecommit.us-east-2.amazonaws.com/v1/repos/s3upload
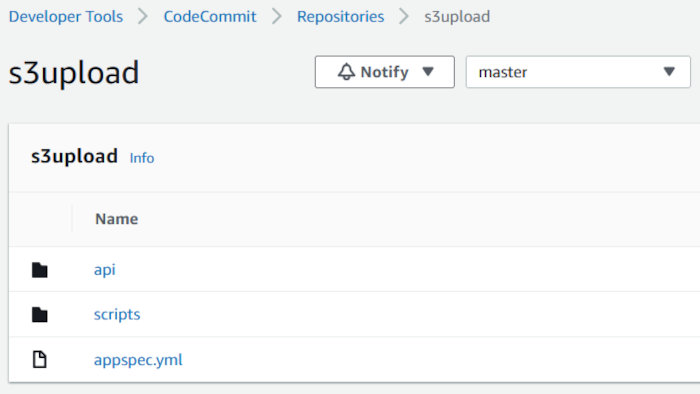
The URL used in the clone command will, obviously, need to be changed to match the repo you just created. Copy over the contents of the “s3upload” folder from my Github repo into the root of the newly cloned repo directory. Once copied, run the following commands to add, commit, and push the files to the repo.
git add .
git commit -m 'Initial commit'
git push
This should push the files to your new CodeCommit repo. You should see something like the following in the AWS console.
I chose not to exclude the “api/node_modules” directory from being pushed to my Git repo and then later using the package.json file to dynamically install Node modules during deployment. This seems counter-intuitive as it would increase bandwidth costs for traffic flowing through the NAT gateway. At scale, using CodeDeploy to install node modules could get costly. A better solution would be to let CodeBuild perform this task. Regardless, I chose to commit the “node_modules” directory to my Git repo and have CodeDeploy push it to instances and save that rabbit-hole for another day.
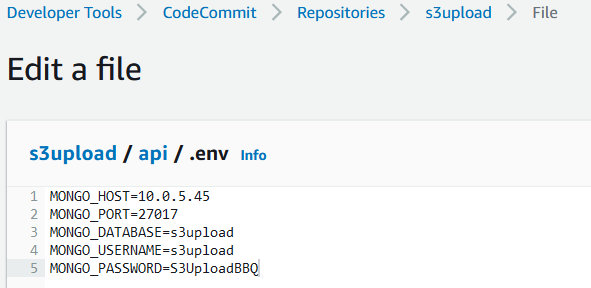
We now need to edit the .env file used by the back-end so the API knows which database host to communicate with. Navigate to this file (api/.env) in CodeCommit and click the edit button. Edit the “MONGO_HOST” variable to match the IP address pointed at by the “MongoInstanceIP” CF output. Fill in the “Author name” and “Email address” and click “Commit Changes”.
This step could be removed and handled easily by using a privately hosted Route 53 zone. Again, I had to limit the scope of this proof-of-concept so I opted not to use this additional AWS service. Just know that it can be used in cases like this.
We’re now at a point to start talking about using CodeDeploy. If you’ve poked around the “s3upload” folder’s contents we just pushed to our CodeCommit repository you probably saw the application specification file (appspec.yml) and some bash shell scripts. These are needed to facilitate a CodeDeploy deployment.
The directives found in the appspec file instruct CodeDeploy on how to handle the following within the context of a deployment.
- A mapping of files from the revision and location on the instance
- The permissions of files to deploy
- Scripts to execute throughout the lifecycle of the deployment
In looking at the files in the scripts directory of our deployment folder, we see start and stop scripts. These are very basic scripts to handle the starting and stopping of the Node server associated with our back-end API.
Something to note is in production you would probably want to use a process manager like PM2 instead of rudimentary scripts like mine.
Another issue to bring up is that upon initial deployment, the stop script does not exist on the targeted instance. This also implies that if you alter your stop script the updates you add will not exist on a targeted instance until after a subsequent deployment completes. This is why I added the stop script functionality into my start script.
Take a look at the start_api.sh script to see this in action.
#!/bin/bash

BASE="/node/s3upload"

# First run of the deployment doesn't get to use the stop_api.sh script.
# As such, we need to kill the current listening node process
if [[ $(netstat -nalpt | grep -c "^tcp.*:80 .*LISTEN .*node") -gt 0 ]]; then
    # Kill node from netstat listing
    netstat -nalpt | grep "^tcp.*:80 .*LISTEN .*node" | awk '{print $7}' | cut -d'/' -f1 | while read PID; do
        kill -9  $PID
    done
fi

# Provide node with our region in an environment variable
AWS_REGION=$(curl --silent http://169.254.169.254/latest/meta-data/placement/region)
export AWS_REGION

cd $BASE
npm start >/var/log/s3upload.log 2>&1 &
In short, the stop script won’t exist on the targeted instance and the deployment will fail without the process-killing logic because the stub server installed on launch is sitting on TCP port 80. This process needs to be killed so the Node server can start using the index.js file deployed to ‘/node/s3upload’ on any targeted instances’ file-systems.
Moreover, some additional aspects of the files in the scripts directory play into how CodeDeploy interacts with an ASG that leverages an ELB. Taken from the following URL:
https://github.com/aws-samples/aws-codedeploy-samples/tree/master/load-balancing/elb-v2
When running a web service, you don’t want customer traffic to be sent to the instances that host your service when a deployment is in progress. For this reason, you might register your instances with a load balancer. During an AWS CodeDeploy in-place deployment, a load balancer prevents internet traffic from being routed to an instance while it is being deployed to, and then makes the instance available for traffic again after the deployment to that instance is complete.
The scripts you see (aside from start_api.sh and stop_api.sh) in the scripts folder were taken from this Github repo. They take care of deregistering the instance, draining any remaining connections, and then re-registering the instance with the ELB after the deployment is complete.
Another reference for using CodeDeploy in conjunction with an ELB can be found here.
https://docs.aws.amazon.com/codedeploy/latest/userguide/integrations-aws-elastic-load-balancing.html
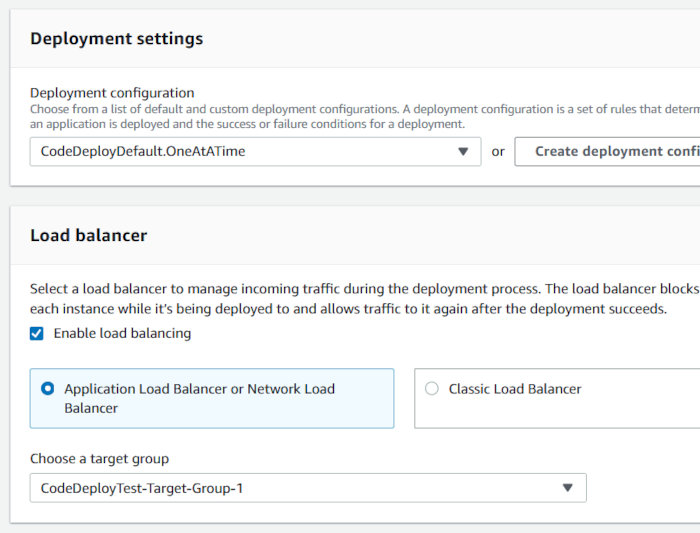
With that said, I altered the deregistration period of the target group configured in my CF template. The default is 5 minutes and way too long for such a proof-of-concept. The directives responsible for this in my template were:
TargetGroupAttributes:
  - Key: deregistration_delay.timeout_seconds
    Value: 30
The common_functions.sh file needs to be edited to match your environment. The link above describes these edits. They end up looking like the following.
# TARGET_LIST defines which target groups behind Load Balancer this instance should be part of.
# The elements in TARGET_LIST should be separated by space.
TARGET_GROUP_LIST="CodeDeployTest-Target-Group-1"

# PORT defines which port the application is running at.
# If PORT is not specified, the script will use the default port set in target groups
PORT="80"

[TRUNCATED]

# Handle ASG processes
HANDLE_PROCS=true

[TRUNCATED]
Putting this all together we now need to take a quick look at the appspec file to see how everything is used.
version: 0.0
os: linux
files:
  - source: api
    destination: /node/s3upload
hooks:
  ApplicationStop:
    - location: scripts/deregister_from_elb.sh
      timeout: 180
      runas: root
    - location: scripts/stop_api.sh
      timeout: 180
      runas: root
  ApplicationStart:
    - location: scripts/start_api.sh
      timeout: 180
      runas: root
    - location: scripts/register_with_elb.sh
      timeout: 300
      runas: root
This file instructs CodeDeploy to place the contents of the “api” directory of the CodeCommit repo into the ‘/node/s3upload’ folder on targeted instances. It also makes use of two lifecycle events to stop and start the installed application. Note that prior to stopping the API, the targeted instance is deregistered from its associated ELB. In the same manner, prior to starting the API, the targeted instance is, once again, registered with the ELB.
There are several other lifecycle events you can hook into with CodeDeploy. Check them out at the following URL.
https://docs.aws.amazon.com/codedeploy/latest/userguide/reference-appspec-file-structure-hooks.html
Regarding the API code-base I featured in my last post, I need to point out that I altered the index.js file to include a “/health” route that checks the database connection so the ELB can determine application health.
The health route in index.js looks like the following:
// health check route
app.get('/health', async function (request, reply) {
    // always return JSON
    reply.header('Content-Type', 'application/json; charset=utf-8');

    if (mongoose.connection.readyState === 1) {
        reply.code(200).send('{ "data": "Database connection is healthy" }');
        return;
    } else {
        reply.code(503).send('{ "data": "Database connection is not healthy" }');
        return;
    }
})
As the API makes use of the AWS SDK, it automatically picks up the associated instance profile and no longer requires hard-coded credentials passed in via environment variables. Slick, right?
I also removed “nodemon” from the package.json file.
{
  "name": "s3upload",
  "version": "1.0.0",
  "description": "",
  "main": "index.js",
  "scripts": {
    "start": "node index.js",
    "test": "echo \"Error: no test specified\" && exit 1"
  },
  "keywords": [],
  "author": "",
  "license": "ISC",
  "dependencies": {
    "@aws-sdk/client-s3": "^3.3.0",
    "@aws-sdk/s3-request-presigner": "^3.3.0",
    "dotenv": "^8.2.0",
    "fastify": "^3.11.0",
    "fastify-cors": "^5.2.0",
    "fastify-multipart": "^3.3.1",
    "mongoose": "^5.11.13",
    "nodemon": "^2.0.7"
  }
}
Now that we have a terse understanding of the appsec file, let’s move on and begin creating a code pipeline that we’ll use to automatically deploy our application every time we update our CodeCommit repo.
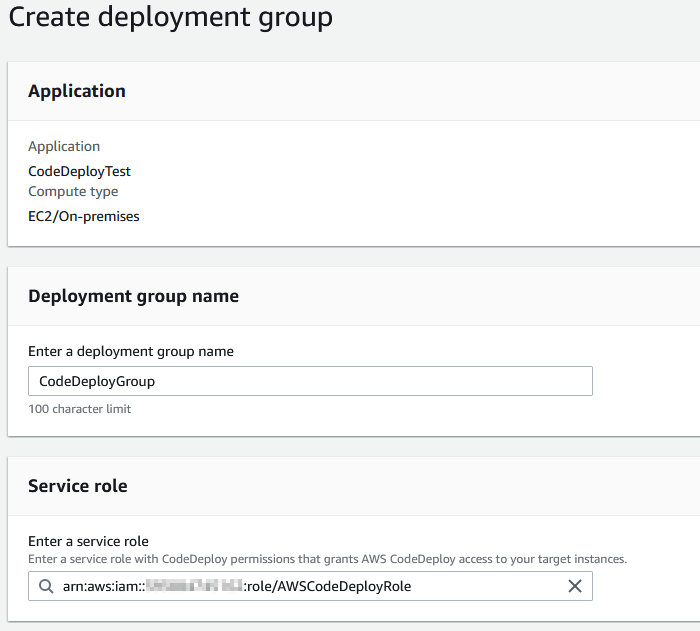
We’ll start this process by creating a Service Role for the CodeDeploy service. Create a role and attach the “AWSCodeDeployRole” AWS managed policy to it. We will need this role when creating a Deployment Group. You can read more about this task at the following URL.
https://docs.aws.amazon.com/codedeploy/latest/userguide/getting-started-create-service-role.html
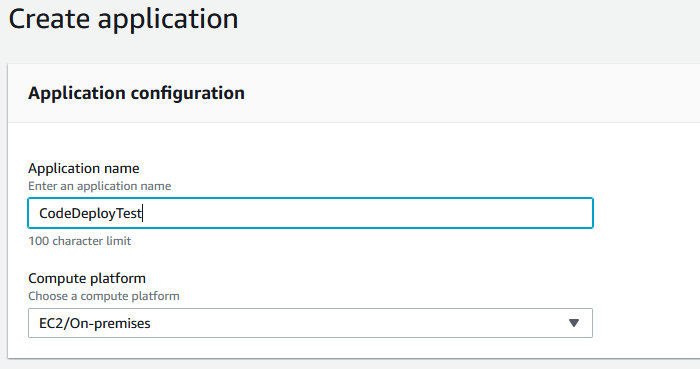
Now that we have a service role, we’ll move on to creating an “Application” in CodeDeploy. Open up the CodeDeploy service in the AWS console and click “Create Application”. Fill in the Application Name and select “EC2/On-premises” as the Computer Platform and click “Create Application”.
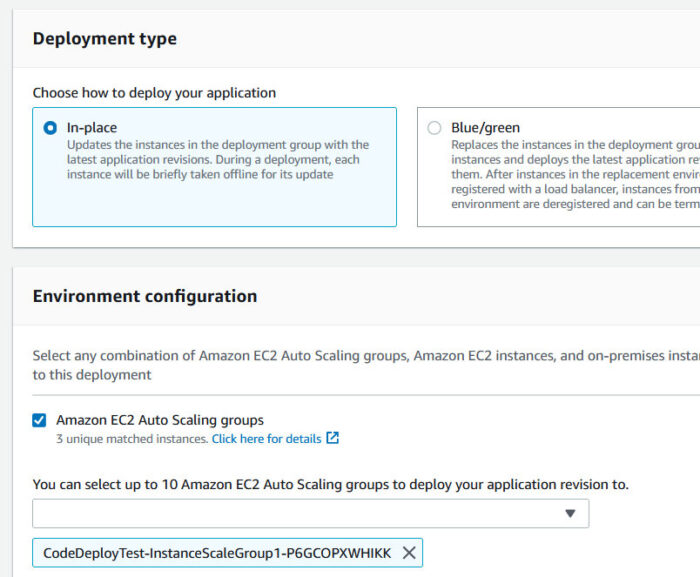
At this point, you’ll be presented with the application view. Click the “Create deployment group” button. Make the following choices before clicking “Create deployment group” again at the bottom of the page. You should see the service role you created earlier appear in the drop-down. You should also see the ASG and ELB target group auto-populate in their respective drop-downs.
Make sure the Deployment Configuration is set to “CodeDeployDefault.OneAtATime”. Concurrent runs are not supported, and the CodeDeployDefault.OneAtATime setting ensures a serial execution of the scripts.
After finishing up with the Deployment Group creation process, open up the CodePipeline service page in the AWS console and hit the “Create Pipeline” button. Choose a Pipeline name and allow the creation wizard to create a service role for your pipeline.
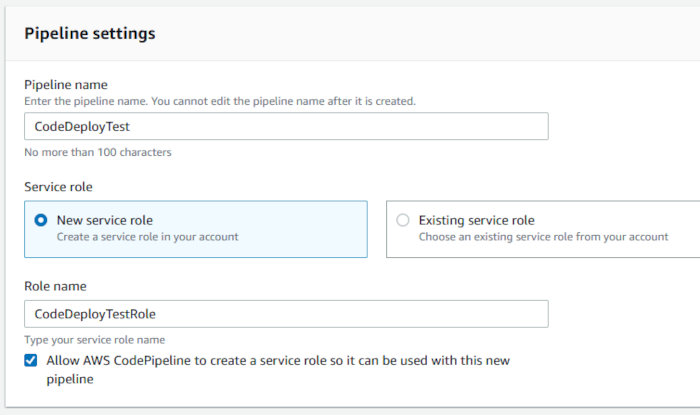
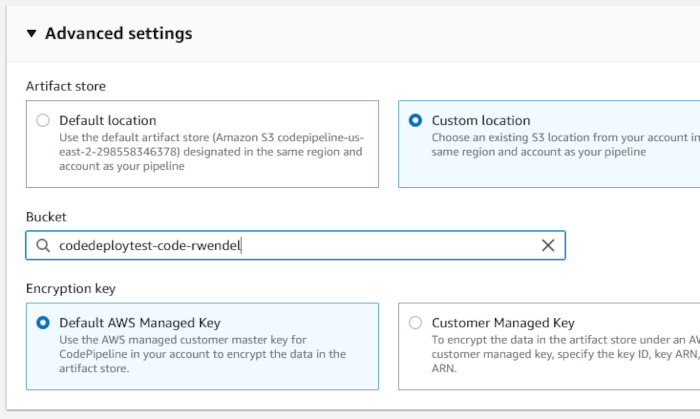
Choose a custom location for the artifact store. Select the bucket we configured with the “CodeBucketName” CF parameter during stack creation. Accept the default Encryption key setting “AWS Managed Key” and click next.
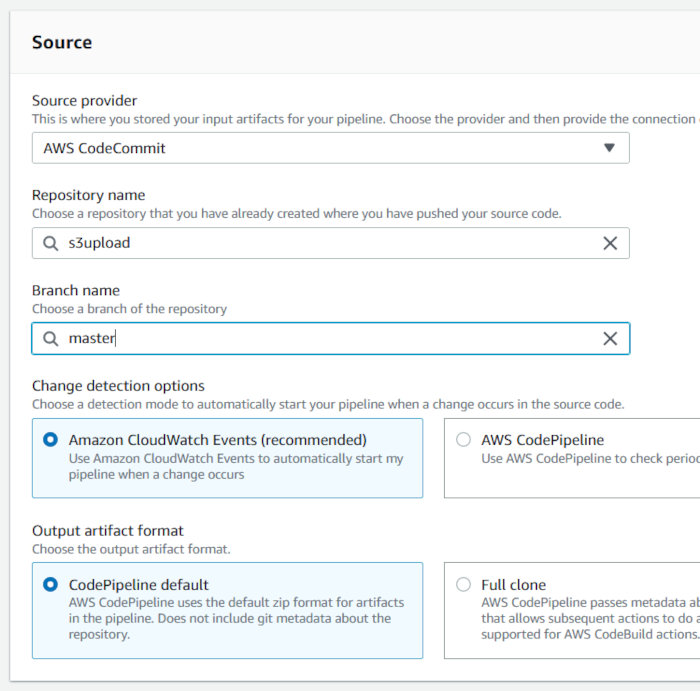
On the “Add source stage” page, select “AWS CodeCommit” as the Source Provider and select your repository. The Branch name should auto-populate with “master”. Leave the defaults selected and click next.
On the “Add build stage” page, click the “Skip build stage” button. We are not building anything for this pipeline. I do plan on creating another post that deals with containers and will certainly use CodeBuild features at this time. For now, we’re moving on.
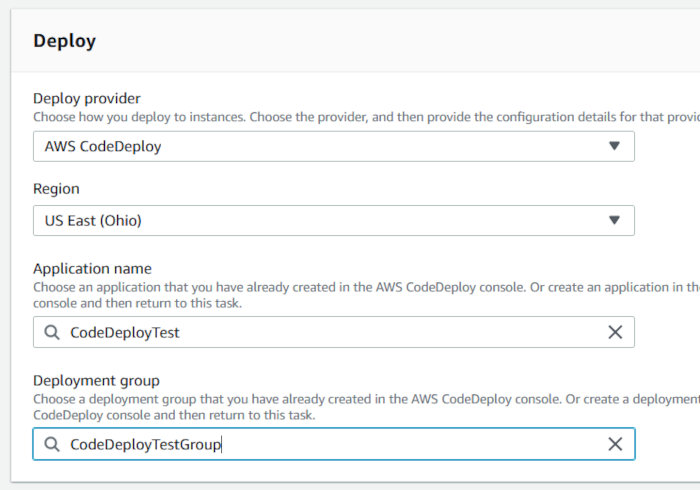
On the “Add deploy stage”, select “AWS CodeDeploy” as the Deploy provider and then select the CodeDeploy application and deployment group you created earlier. Click next.
Review all of your settings and then click the “Create pipeline” button. The deployment will commence at this point. You’ll then be presented with something like the following:
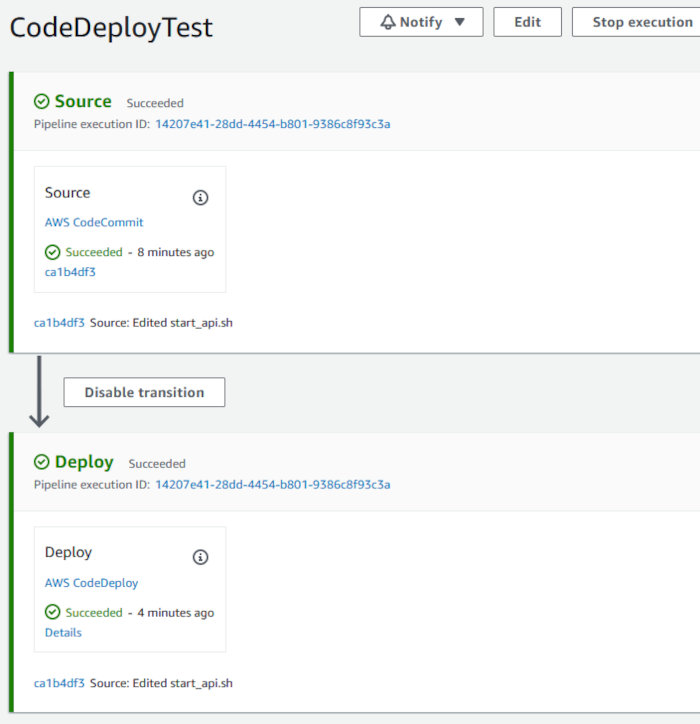
Both of the pipeline stages will be blue at first. It’s only until each stage succeeds that they turn green.
Clicking through to the deployment you can review each of the lifecycle events.
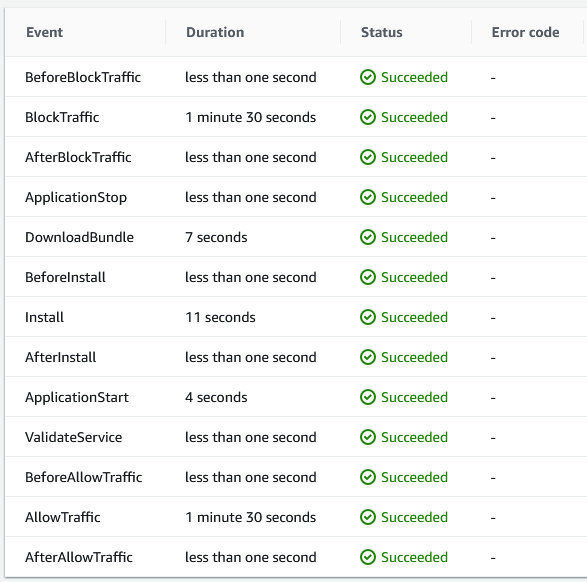
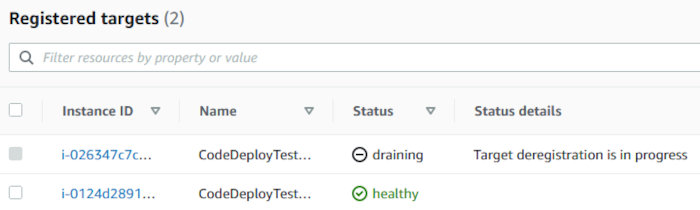
While the deployment is taking place, you can head over to the EC2 Target Groups interface and watch the targets get deregistered by the script execution taking place in the “ApplicationStop” lifecycle hook.
If everything is green, go hit the ELB URL again and see if you can use the application.
If you ever need to troubleshoot a deployment, you can look through the logs for each deployment on the targeted instances. Logs can be found in deployment directories. Something like the following:
/opt/codedeploy-agent/deployment-root/f556ea6d-4a95-4472-afd5-52507896920e/d-K4TYQO538
You will see the downloaded bundle (pulled from the provisioned S3 bucket), a directory where the bundle was extracted, and a log file directory.
[root@ip-10-0-3-211 d-K4TYQO538]# ls -l
total 107480
-rw-r--r-- 1 root root 110057675 Feb 19 00:04 bundle.tar
drwxr-xr-x 4 root root        51 Feb 19 00:04 deployment-archive
drwxr-xr-x 2 root root        25 Feb 19 00:04 logs

[root@ip-10-0-3-211 d-K4TYQO538]# cd logs

[root@ip-10-0-3-211 logs]# head -10 scripts.log
2021-02-19 00:04:40 LifecycleEvent - ApplicationStart
2021-02-19 00:04:40 Script - scripts/start_api.sh
2021-02-19 00:04:40 Script - scripts/register_with_elb.sh
2021-02-19 00:04:40 [stderr]Running AWS CLI with region: us-east-2
2021-02-19 00:04:40 [stderr]Started register_with_elb.sh at 2021-02-19 00:04:40
2021-02-19 00:04:40 [stderr]Checking if instance i-072182af8153efc10 is part of an AutoScaling group
2021-02-19 00:04:42 [stderr]Found AutoScaling group for instance i-072182af8153efc10: CodeDeployTest-InstanceScaleGroup1-FOMMJ1QHST69
2021-02-19 00:04:42 [stderr]Checking that installed CLI version is at least at version required for AutoScaling Standby
2021-02-19 00:04:43 [stderr]Checking minimum required CLI version (1.10.55) against installed version (1.18.147)
2021-02-19 00:04:43 [stderr]Attempting to move instance out of Standby
In my initial proof-of-concept, I only set the Desired Capacity of my ASG to a single instance. After bumping the desired and minimum capacities up to 2, I was pleasantly surprised that my new instance received the deployment, as well.
Terminating one of the two instances also resulted in the replacement instance seeing a new deployment execute and succeed. Great success!

Now, before I get all weepy-eyed and close out with some final comments, let’s push a new git commit to our CodeCommit repository and see if both systems receive new deployments. That was, after all, the point of this entire, long-winded blog post.
I updated index.js (in the API code-base) to return “Hello world – updated!”, instead of just “Hello world”, for the apex route and pushed a new commit. As the deployment group was configured to update only one instance at-a-time, I was able to monitor both instances from the command line using curl hitting the localhost.
I executed the following command on both systems and waited for the magic to happen.
$ watch -n 3 "echo "hostname = $(hostname)"; echo; curl -s http://127.0.0.1"
Sure enough, I saw the desired results.
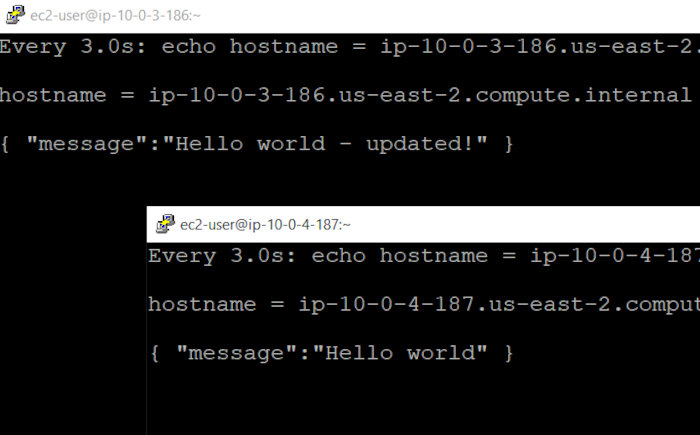
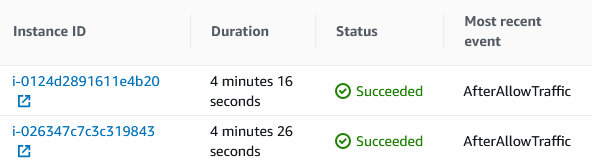
The updated deployment was sent to both hosts one after the other. Watching the AWS console eventually showed success for both hosts, as well.
Now that I’m finally at the end of this, I want to leave you with some parting thoughts.
The first being that if this were a real production environment, I would have the instance launch profile install the application instead of waiting for the deployment to handle it. The manner in which I used a stub server doesn’t make sense. I only did this for academic purposes. By installing the application on launch, I am assuming that I would need to create a way for CodeDeploy to verify if the version installed is the current version and, if so, to terminate the deployment. This would need to occur during the “BeforeBlockTraffic” lifecycle event.
In addition to the issues I’ve already mentioned, it would probably behoove a production environment’s ASG to utilize a scale-up and scale-down policy based on something other than CPU utilization. A metric tied to the user-experience would, most likely, be preferable. Implementing ELB health checks for the ASG might not hurt, either.
You can read more about EC2 ASGs using ELB health checks at the following URL.
https://docs.aws.amazon.com/autoscaling/ec2/userguide/healthcheck.html
Thanks for stopping by and making it this far. I hope this was helpful (I certainly learned a lot)!