Building off my last two posts, I wanted to utilize the simple application I created in yet another proof-of-concept that involves the following AWS technologies:
- Elastic Container Service (ECS)
- Network automation via Cloudformation
- CodeCommmit
- CodePipeline
- CodeBuild
For this adventure, I wanted to work through an AWS CI/CD pipeline that utilized CodeBuild to build containers that are automatically deployed to an ECS cluster.
I utilized the bulk of the CloudFormation (CF) template featured in my last post. The only major differences were that I chose not to use an AutoScaling Group (ASG) in conjunction with ECS and, instead, launched two Elastic Cloud Compute (EC2) instances to allow ECS to run Docker containers on. In production, I would assume that using FarGate is far more advantageous in terms of cloud elasticity and cost savings but for this proof-of-concept, I wanted the ability to troubleshoot from the command line of both Docker hosts.
My CF template spins up a highly available Virtual Private Cloud (VPC) that spans two Availability Zones (AZ) and features three separate subnets per AZ. This ended up looking like the following:
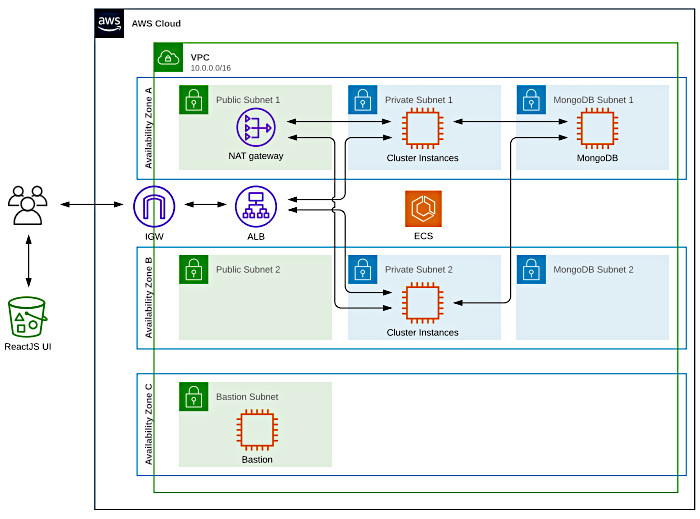
This template can be found in the root of the GitHub repo that accompanies this post.
Some things to note:
- I did not configure a highly available MongoDB cluster
- The bastion lives in a third subnet has its own Elastic IP (EIP), and routes through the main Internet Gateway (IGW)
- I only configured a single NAT Gateway due to cost issues
- The React front-end from my last blog post is hosted in S3
Instances are protected by Security Groups (SG). I left the Network Access Control Lists (NACL) wide open but highly recommend implementing the Principle of Least Privilege by locking these down to what is needed by each subnet in terms of traffic flow. I may circle back and update these along with this post.
This time around, the EC2 instance profile required various permissions to interact with ECS. As each instance will run Docker and host containers, the required access controls are a good bit different. The profile generated by my CF template was constructed using information taken from the following URL.
https://docs.amazonaws.cn/en_us/AmazonECS/latest/developerguide/instance_IAM_role.html
Two other roles are constructed in my CF template. The “Task Execution Role” and “Task Role” are required by ECS and running tasks to interact with AWS services. I’ll touch on both of these a little later.
Something else to note about the EC2 instances utilized by the ECS service was how the ECS agent was installed and enabled. The ECS agent needs to be installed and pointed at the ECS cluster in order to properly function. This was achieved using the following UserData script for both instances.
#!/bin/bash -xe
amazon-linux-extras install -y ecs
echo ECS_CLUSTER='${NamingPrefix}-Cluster' >> /etc/ecs/ecs.config
echo ECS_ENABLE_TASK_IAM_ROLE=true >> /etc/ecs/ecs.config
echo ECS_ENABLE_TASK_IAM_ROLE_NETWORK_HOST=true >> /etc/ecs/ecs.config
systemctl enable --now --no-block docker.service
systemctl enable --now --no-block ecs.service
In the same manner as featured in my last post, the MongoDB instance autoconfigures itself via its UserData script. Please reference my last post for more information on this. The initial database configuration makes provisions that allow the back-end API to interact with two S3 buckets. Make sure you revisit the Mongo instance’s UserData if you are following along.
At this point, let’s jump into creating our stack and move on with this experiment. Log on to the AWS console and access the CloudFormation service. Hit the “Create Stack” button and load up the “ECS Pipeline POC.yml” file found in the root of my GitHub repo.
Hit next and work through the parameters. The only prerequisite for this template is having an SSH Key Pair. Make sure you have one configured already and work through the parameters. Most of the defaults should be fine. The only non-default values are:
- Stack Name
- NamingPrefix
- AvailabilityZone1
- AvailabilityZone2
- AvailabilityZoneBastion
- KeyName
- WebBucketName
Make sure you fill these out prior to clicking next. No stack options are necessary. Click next. Make sure to tick the box for “I acknowledge that AWS CloudFormation might create IAM resources” on the final review page at the bottom before clicking next. This is alerting you to the fact that you’re configuring IAM permissions for something in the stack that could be used for malicious purposes. Principle of Least Privilege!
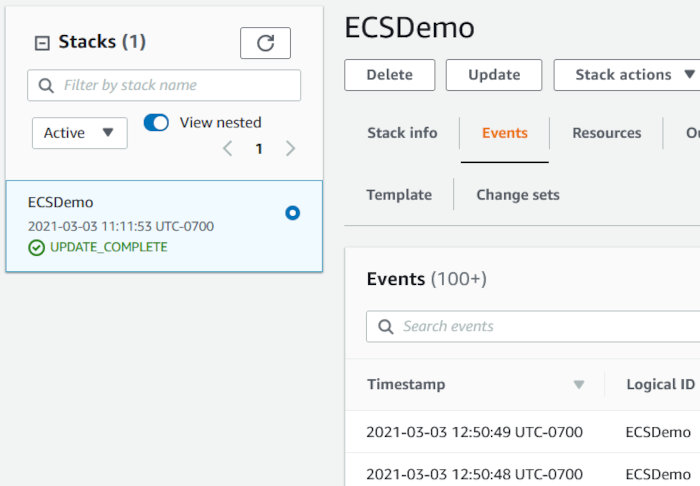
Once the stack is created you should see something like the following:
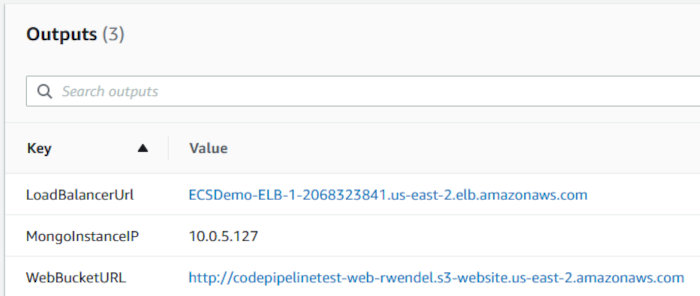
Click the “Outputs” tab and make note of some information my template alerts you to. We’ll be using this shortly.
Next, we need to build the “seed” container that we’ll use for the initial ECS task prior to pushing out updates via CodePipeline. Grab the Git repo for this blog post and clone it to your local system.
The DockerFile for our container is pretty simple. Not much going on aside from installing the S3Upload application along with a few packages and NodeJs.
FROM ubuntu:latest

# don't prompt for apt stuffs
ENV DEBIAN_FRONTEND noninteractive

# timezone data
ENV TZ=UTC

# Create app directory
WORKDIR /usr/src/app

# prep the environment
RUN ln -snf /usr/share/zoneinfo/$TZ /etc/localtime && \
    apt-get update && \
    apt-get install -y curl && \
    curl -fsSL https://deb.nodesource.com/setup_15.x | /bin/bash - && \
    apt-get install -y nodejs && \
    apt-get remove -y curl && \
    apt-get clean && \
    groupadd node && \
    useradd -g node -s /bin/bash node

# Install app dependencies
# A wildcard is used to ensure both package.json
# AND package-lock.json are copied
COPY api/package*.json ./

RUN npm install
# If you are building your code for production
# RUN npm ci --only=production

# Bundle app source
COPY api/ ./

# Expose our service port
EXPOSE 8000

# run as our non-root user
USER node

# what do?
CMD [ "node", "index.js" ]
Do note that we are exposing port 8000 instead of 80. In the last post, I had root running the Node application and, as such, it was able to open a socket on a privileged port. This time around, I opted for a more secure configuration by adding a non-privileged user (node) to the container and having it execute the application. Non-root users cannot open sockets on privileged ports. The code for the API service was also altered to reflect this.
Prior to building our container, we’ll need to edit api/.env and replace the MONGO_HOST value with the IP address pointed at by the “MongoInstanceIP” CF stack output. This lets the API knows which database host to communicate with.
MONGO_HOST=10.0.5.127
MONGO_PORT=27017
MONGO_DATABASE=s3upload
MONGO_USERNAME=s3upload
MONGO_PASSWORD=S3UploadBBQ
This step could be removed and handled easily by using a privately hosted Route 53 zone. I opted not to use this additional AWS service in order to limit the scope of this proof-of-concept. Just know that it can be used in cases like this.
Run the following command to build the container.
docker build -t s3upload .
You should see output similar to the following:
Sending build context to Docker daemon  869.4kB
Step 1/11 : FROM ubuntu:latest
 ---> f643c72bc252
Step 2/11 : ENV DEBIAN_FRONTEND noninteractive
 ---> Using cache
 ---> da7cef24b16c
Step 3/11 : ENV TZ=UTC
 ---> Using cache
 ---> 46920390da7a
Step 4/11 : WORKDIR /usr/src/app
 ---> Using cache
 ---> c90645b3e49b
Step 5/11 : RUN ln -snf /usr/share/zoneinfo/$TZ /etc/localtime &&     apt-get update &&     apt-get install -y curl &&     curl -fsSL https://deb.nodesource.com/setup_15.x | /bin/bash - &&     apt-get install -y nodejs &&     apt-get remove -y curl &&     apt-get clean &&     groupadd node &&     useradd -g node -s /bin/bash node
 ---> Using cache
 ---> 4d1a79a9f614
Step 6/11 : COPY api/package*.json ./
[TRUNCATED]
Listing your local images should show the container is just over 500MBs.
# docker image ls
REPOSITORY                                           TAG                 IMAGE ID            CREATED              SIZE
s3upload                                             latest              5f173ae22ceb        About a minute ago   514MB
From here, we need to create an Elastic Container Registry repository to store our container images. Open up the Elastic Container Registry service page in the AWS console and hit the “Create repository” button. Enter a unique repository name, accept all the defaults, and then click “Create repository”.
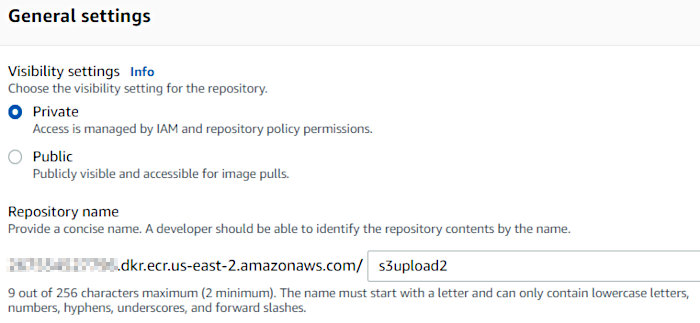
I named this repo “s3upload2” because I already had a CodeCommit repo named “s3upload”. I wanted to keep things congruent as we got further down the road. You’ll see a CodeCommit repo named “s3upload2” pop up later in this post.
With your new ECR repo created, it’s time to tag and push our seed container to the new repo. Using an IAM account with the appropriate privileges, run the following commands.
docker login -u AWS -p $(aws ecr get-login-password --region AWS_REGION) AWS_ACCOUNT_ID.dkr.ecr.AWS_REGION.amazonaws.com
docker tag 5f173ae22ceb AWS_ACCOUNT_ID.dkr.ecr.AWS_REGION.amazonaws.com/s3upload2:seed
docker push AWS_ACCOUNT_ID.dkr.ecr.AWS_REGION.amazonaws.com/s3upload2:seed
If you’re following along, you’ll need to replace the AWS_REGION, AWS_ACCOUNT_ID, and Image IDs to match those of your environment.
You should see output like the following after pushing your container to ECR.
The push refers to repository [AWS_ACCOUNT_ID.dkr.AWS_REGION.amazonaws.com/s3upload2]
d19eec312bd5: Pushed
186182977597: Pushed
b0cf44c5fd70: Pushed
f68d0533444f: Pushed
05c9fdd6a212: Pushed
f6253634dc78: Pushed
9069f84dbbe9: Pushed
bacd3af13903: Pushed
seed: digest: sha256:457a0bd5082adf575c13da815ddfc05538ab88c94c244318d4170ddfbd8885bb size: 1995
Now that we’ve pushed our seed container to ECR, we can spin up some “tasks” (containers) in ECS. We’ll depart from using the AWS Console for the next part and, instead, use the AWS CLI to first create an ECS task followed by a service to run it.
We’ll need to create two different JSON documents in order to do this. The following will be used to create our task definition. Make note of the highlighted regions and adjust accordingly if following along.
{
  "family": "ECSDemo-S3Upload-Task-1",
  "executionRoleArn":"arn:aws:iam::AWS_ACCOUNT_ID:role/ECSDemo-ECSTaskExecutionRole-HDZCDNJR5US7",
  "taskRoleArn":"arn:aws:iam::AWS_ACCOUNT_ID:role/ECSDemo-ECSTaskRole-DGCSLGJBWEH7",
  "containerDefinitions": [
    {
      "name": "ECSDemo-S3Upload-1",
      "image": "AWS_ACCOUNT_ID.dkr.ecr.AWS_REGION.amazonaws.com/s3upload2:seed",
      "cpu": 128,
      "memoryReservation": 128,
      "portMappings": [
        {
          "hostPort": 0,
          "containerPort": 8000,
          "protocol": "tcp"
        }
      ],
      "essential": true,
      "environment": [
        {
          "name": "AWS_REGION",
          "value": "us-east-2
        }
      ]
    }
  ]
}
You can obtain the ARN for the executionRoleArn and taskRoleArn and from the AWS CLI by using the following command.
aws iam list-roles --query "Roles[?starts_with(RoleName,'ECSDemo')].Arn"
The AWS_REGION environment variable is very important for this task definition. As I am using the AWS SDK to interact with the S3 service, the AWS_REGION environment variable needs to be set in order to allow for API calls to function properly.
Another very important caveat to note here is that without the “Task Role”, the environment variable “AWS_CONTAINER_CREDENTIALS_RELATIVE_URI” won’t get set by the ECS Agent in the container instance and then passed on to a task’s (container’s) process with PID 1. Without this environment variable, the AWS SDK can’t authenticate and make API calls. As in, whatever interaction with AWS services your application needs to perform will not function properly.
The gist is there is a distinction between the Task Execution Role and the Task Role. It breaks down something like this.
Task execution role
This IAM role is required by tasks to pull container images and publish container logs to Amazon CloudWatch.
Task Role
The IAM role that tasks can use to make API requests to authorized AWS services. This is the IAM role that containers in this task can assume.
You can read more about this issue at the following links.
https://docs.aws.amazon.com/AmazonECS/latest/userguide/task-iam-roles.html
https://docs.aws.amazon.com/AmazonECS/latest/developerguide/task_execution_IAM_role.html
https://forums.aws.amazon.com/thread.jspa?threadID=273767
In the case of my proof-of-concept, the task role I employed is what allows a task to interact with the S3 service and the two buckets I use to store files.
Additionally, you can read up on task definition parameters at the following URL.
https://docs.aws.amazon.com/AmazonECS/latest/developerguide/task_definition_parameters.html
The following will be used to create our service.
{
    "cluster": "ECSDemo-Cluster",
    "serviceName": "ECSDemo-Service-1",
    "taskDefinition": "ECSDemo-S3Upload-Task-1",
    "loadBalancers": [
        {
            "targetGroupArn": "arn:aws:elasticloadbalancing:AWS_REGION:AWS_ACCOUNT_ID:targetgroup/ECSDemo-Target-Group-1/f2a7bba101d1b263",
            "containerName": "ECSDemo-S3Upload-1",
            "containerPort": 8000
        }
    ],
    "role": "arn:aws:iam::AWS_ACCOUNT_ID:role/aws-service-role/ecs.amazonaws.com/AWSServiceRoleForECS",
    "launchType": "EC2",
    "desiredCount": 2,
    "deploymentConfiguration": {
        "maximumPercent": 200,
        "minimumHealthyPercent": 100
    },
    "placementStrategy": [
        {
            "type": "spread",
            "field": "attribute:ecs.availability-zone"
        },
        {
            "type": "spread",
            "field": "instanceId"
        }
    ],
    "healthCheckGracePeriodSeconds": 0,
    "schedulingStrategy": "REPLICA",
    "enableECSManagedTags": true,
    "tags": [
        {
            "key": "Owner",
            "value": "Ryan"
        }
    ]
}
This service definition makes use of an AWS-managed service-linked role (AWSServiceRoleForECS). Check it out in IAM to see what permissions the underlying policy grants the ECS service. You can read more about this service-linked role at the following URL.
https://docs.aws.amazon.com/AmazonECS/latest/developerguide/using-service-linked-roles.html
You can obtain the ARN for the AWSServiceRoleForECS role from the AWS CLI by using the following command.
aws iam list-roles --query "Roles[?RoleName=='AWSServiceRoleForECS'].Arn"
Again, make note of the highlighted regions and adjust accordingly if following along. Also, do note that not all of the options are necessary. I included a good number of defaults just in case you wanted to make some changes.
You can obtain the target group ARN from the AWS CLI by using the following command.
aws elbv2 describe-target-groups --query "TargetGroups[?TargetGroupName=='ECSDemo-Target-Group-1'].TargetGroupArn"
You can read up on service definition parameters at the following URL.
https://docs.aws.amazon.com/AmazonECS/latest/developerguide/service_definition_parameters.html
Using an IAM account with the appropriate privileges, run the following commands to create an ECS task definition and service.
aws ecs register-task-definition --cli-input-json file://task-definition.json
aws ecs create-service --cli-input-json file://ecs-service.json
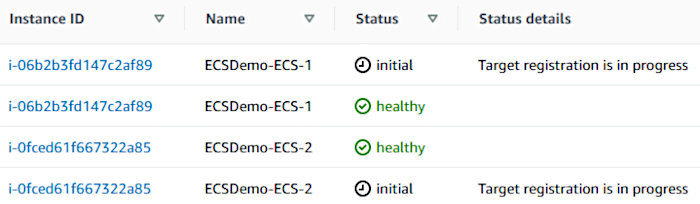
Open up the ECS service page in the AWS console and verify your service and tasks were created. You should see something like the following after clicking into your cluster.
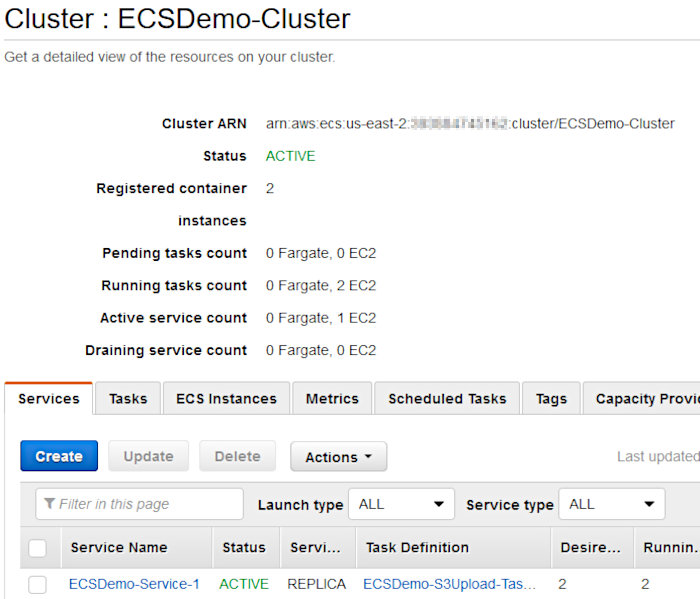
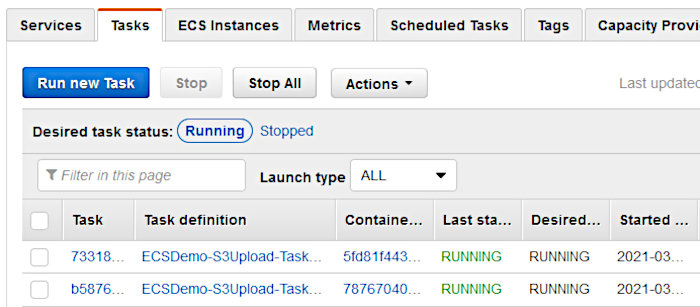
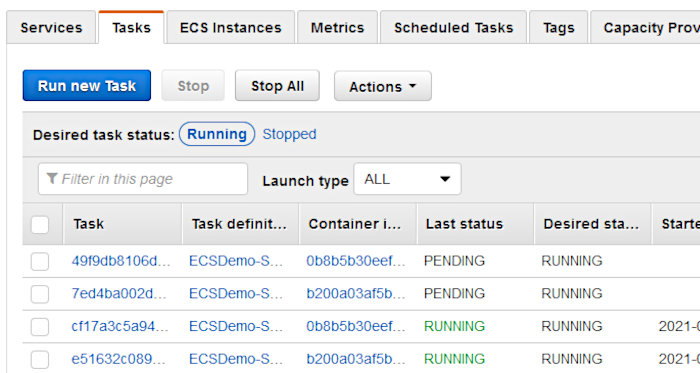
Clicking on the “Tasks” tab should show two tasks are running. You may have to wait a short minute to see these pop up.
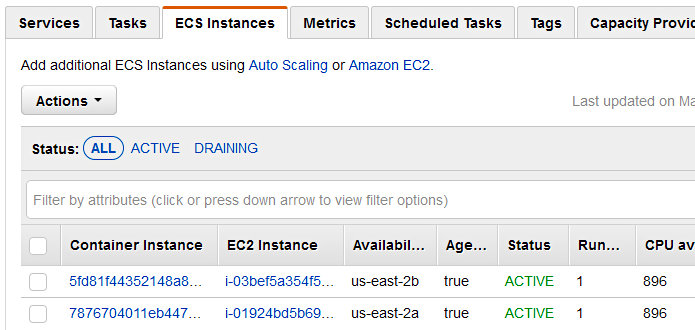
Additionally, you can verify that your containers are properly registered with the ECS cluster by clicking on the “EC2 Instances” tab.
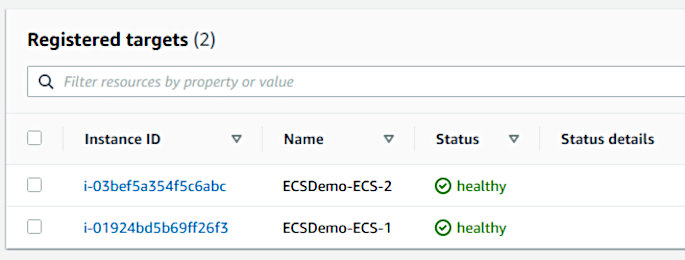
It also wouldn’t hurt to verify that the tasks registered with their associated load balancer. Open up the EC2 service page in the AWS console, make your way to the appropriate target group, and observe the target status of each container.
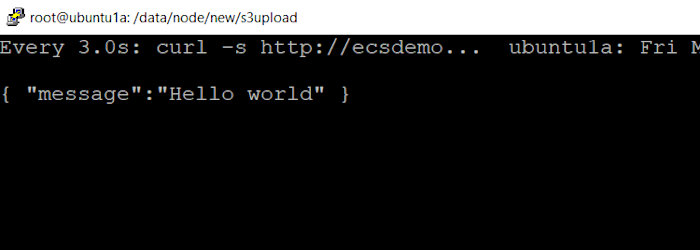
And finally, make a request to the ELB URL pointed at by the “LoadBalancerUrl” CF output to verify the API is serving requests.
# curl http://ecsdemo-elb-1-2068323841.us-east-2.elb.amazonaws.com
{ "message":"Hello world" }
We’ve successfully spun up our infrastructure and populated it with an ECS service and task. Most excellent!
Let’s now upload our front-end and test that we can upload to, download from, and delete files stored in S3. Hit my Github repo from my previous post and grab the “reactjs” folder and place it on a system with Node installed. Open up the “.env” file in the root of the directory and place only the hostname from the ELB URL in the parameter named “REACT_APP_UPLOAD_API_HOST”. It should end up looking like the following.
REACT_APP_UPLOAD_API_HOST=ecsdemo-elb-1-2068323841.us-east-2.elb.amazonaws.com
REACT_APP_UPLOAD_API_PORT=80
Run the following from the root of the “reactui” directory to create files we can use on a basic HTTP server.
npm run build
Once the command finishes, you should see something like the following:
> reactjs@0.1.0 build
> react-scripts build

Creating an optimized production build...
Compiled with warnings.

src/App.js
  Line 9:8:  'util' is assigned a value but never used  no-unused-vars

[TRUNCATED]
Something to note: Editing the .env file and then running build is pretty cumbersome. If this were a live production environment, I’d utilize something like Webpack’s Externals to pull in the parameter file as an external dependency at runtime. There is already enough going on in this proof-of-concept, so I decided to leave this part out.
From here we’ll take the contents of the “build” directory we just created and upload it to the S3 bucket we created to store our React front-end. The one we configured with the “WebBucketName” CF parameter during stack creation. You should see something like the following after having uploaded everything. Make sure to include the “static” folder.
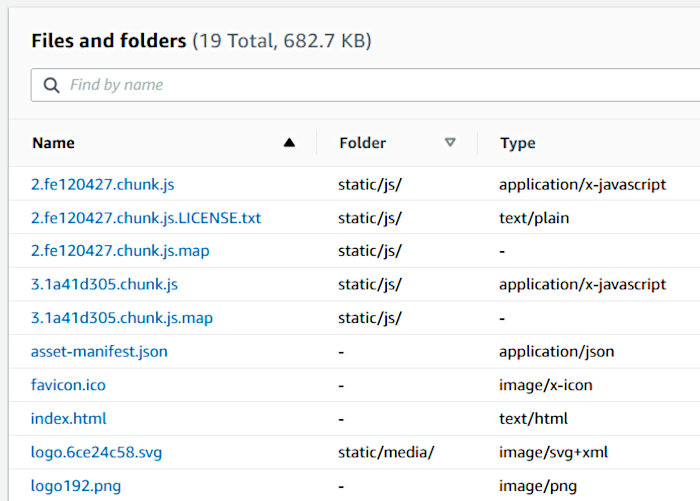
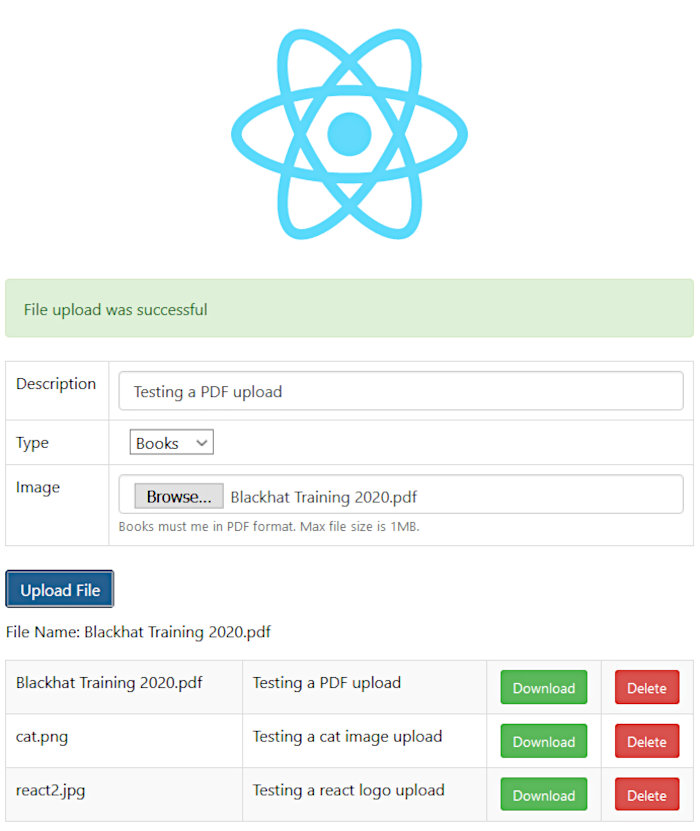
Once uploaded, grab the URL pointed at by the “WebBucketURL” CF output and open it in your browser. You should be greeted by a simple application that allows you to interact with the S3 service. Verify that you can upload, download, and delete files.
After verifying the application is functioning properly, we’ll want to look at using CodePipeline to deploy updates to our ECS tasks. We’ll start this process by creating a CodeCommit Repository to store the source files for our containers along with the specification file we’ll provide to CodeDeploy.
Open up the CodeCommit service page in the AWS console and hit the “Create Repository” button and create a new repo. Fill in the name and description fields and then click “Create”.
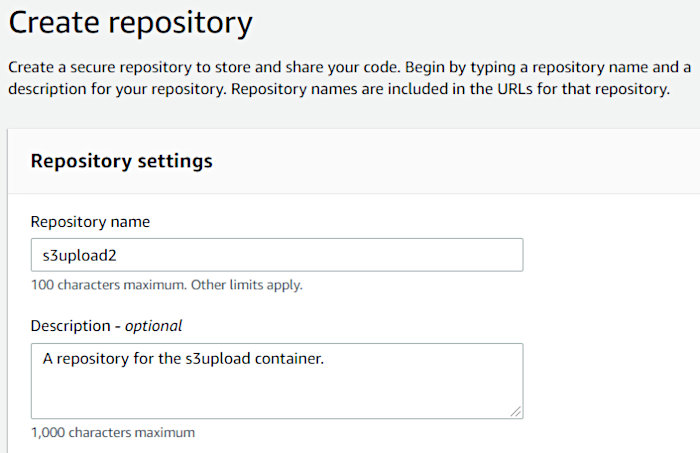
Again, note that I created this CodeCommit repo as “s3upload2”. I did this because I already have another repo named “s3upload”.
Get on to the command line and execute the following to clone the empty repo you just created. The credentials used by the AWS CLI will require access to the newly created CodeCommit repo.
git config --global credential.helper '!aws codecommit credential-helper $@'
git config --global credential.UseHttpPath true
git clone https://git-codecommit.us-east-2.amazonaws.com/v1/repos/s3upload2
The URL used in the clone command will, obviously, need to be changed to match the repo you just created. Copy the entire contents of my Github repo into the root of the newly cloned CodeCommit repo directory. Once copied, run the following commands to add, commit, and push the files to the repo.
git add .
git commit -m 'Initial commit'
git push
This should push the files to your new CodeCommit repo. You should see something like the following in the AWS console.
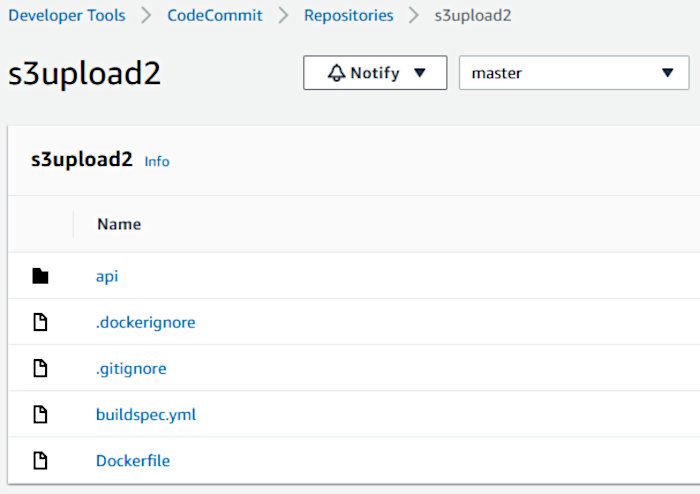
Make note of the two ignore files (.gitignore and .dockerignore). The former looks like the following.
api/node_modules
npm-debug.log
The latter looks like.
api/node_modules
.git
ecs-service.json
task-definition.json
Making use of a .gitignore file allows us to prevent Git from tracking (and transmitting) various files and directories. We don’t need the “node_modules” directory to be tracked or downloaded during the build process. CodeBuild will dynamically rebuild this directory from the package.json file during the build process of our CodePipeline. You can read more about the .gitignore file at the following link.
https://www.pluralsight.com/guides/how-to-use-gitignore-file
Making use of a .dockerignore file serves a similar purpose. When CodeDeploy clones the s3upload2 CodeCommit repository during the build process, the files and directories listed in the .dockerignore file aren’t needed and won’t be downloaded. Again, the “node_modules” directory will be rebuilt dynamically during the Docker build process. You can read more about the .dockerignore file at the following link.
https://codefresh.io/docker-tutorial/not-ignore-dockerignore-2/
Now that we’ve got our CodeCommit repo set up, we need to go over the buildspec.yml file that instructs CodeBuild on how to build our containers. The file is broken down in the following manner.
Pre-build stage:
- Log in to Amazon ECR.
- Set the repository URI to your ECR image and add an image tag with the first seven characters of the Git commit ID of the source.
Build stage:
- Build the Docker image.
- Tag the image both as latest and with the Git commit ID.
Post-build stage:
- Push the image to your ECR repository with both tags.
- Write a file called imagedefs.json in the build root that has your Amazon ECS service’s container name along with the image and tag.
The deployment stage of our pipeline uses the information written to imagedefs.json to create a new revision of our service’s task definition. After the new task definition revision is created, CodeDeploy will update the service to ensure the new task definition gets used. The imagedefs.json file is required for the ECS job worker.
The buildspec.yml used in this proof-of-concept looks like the following.
version: 0.2

phases:
  pre_build:
    commands:
      - echo Logging in to Amazon ECR...
      - aws --version
      - ECS_CONTAINER="ECSDemo-S3Upload-1"
      - REPO_NAME=s3upload2
      - REPO_HOST=AWS_ACCOUNT_ID.dkr.ecr.us-east-2.amazonaws.com
      - REPO_URI=${REPO_HOST}/${REPO_NAME}
      - ECR_PASSWORD=$(aws ecr get-login-password --region ${AWS_DEFAULT_REGION})
      - docker login -u AWS -p ${ECR_PASSWORD} ${REPO_HOST}
      - COMMIT_HASH=$(echo $CODEBUILD_RESOLVED_SOURCE_VERSION | cut -c 1-7)
      - IMAGE_TAG=${COMMIT_HASH:=latest}
  build:
    commands:
      - echo Build started on $(date)
      - echo Building the Docker image...
      - docker build -t $REPO_URI:latest .
      - docker tag $REPO_URI:latest $REPO_URI:$IMAGE_TAG
  post_build:
    commands:
      - echo Build completed on $(date)
      - echo Pushing the Docker images...
      - docker push $REPO_URI:latest
      - docker push $REPO_URI:$IMAGE_TAG
      - echo Writing image definitions file...
      - echo "[{\"name\":\"${ECS_CONTAINER}\",\"imageUri\":\"${REPO_URI}:${IMAGE_TAG}\"}]" > imagedefs.json
artifacts:
  files: imagedefs.json
Please reference the following links for more information related to the build specification file and using CodeDeploy for ECS tasks.
https://docs.aws.amazon.com/codebuild/latest/userguide/build-spec-ref.html
https://docs.aws.amazon.com/codepipeline/latest/userguide/ecs-cd-pipeline.html
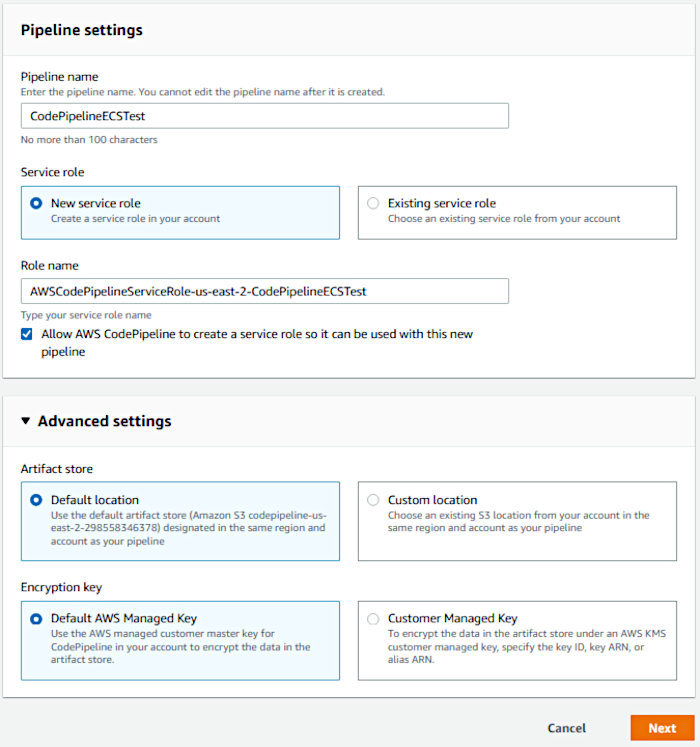
At this point, we’ve got all we need to construct our CodePipeline CI/CD pipeline. Open up the CodePipeline service page in the AWS console and hit the “Create Pipeline” button. Choose a Pipeline name and allow the creation wizard to create a service role for your pipeline.
In my previous post, I had used a custom location for the artifact store. Trying this again didn’t prove successful as I ended up having an issue with an auto-generated role. To make things easy, I chose not to use a custom artifact store this time around and used the default, instead.
Accept the default Encryption key setting “AWS Managed Key” and click next.
On the “Add source stage” page, select “AWS CodeCommit” as the Source Provider and select your repository. The Branch name should auto-populate with “master”. Leave the defaults selected and click Next.

For the “Build Provider”, select “AWS CodeBuild”. As we’ll need a “Build Project” at this point, click the “Create project” button.
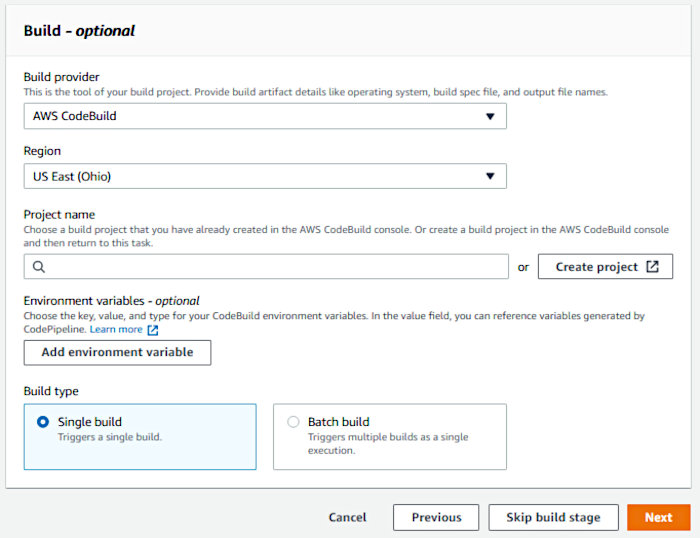
For the “Project configuration” section, fill in the project name.

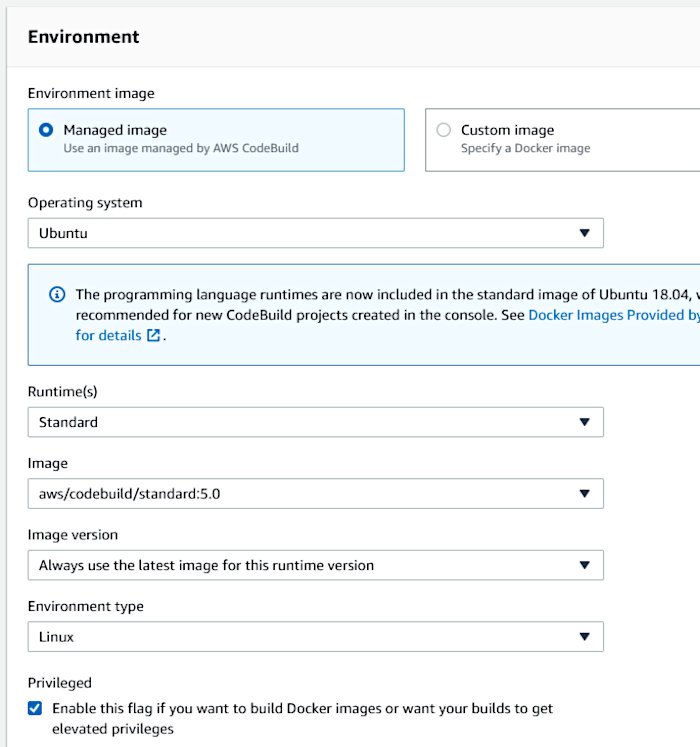
Configure the “Environment” section in the following manner. Make sure the “Privileged” toggle is set. This is required for building Container images.
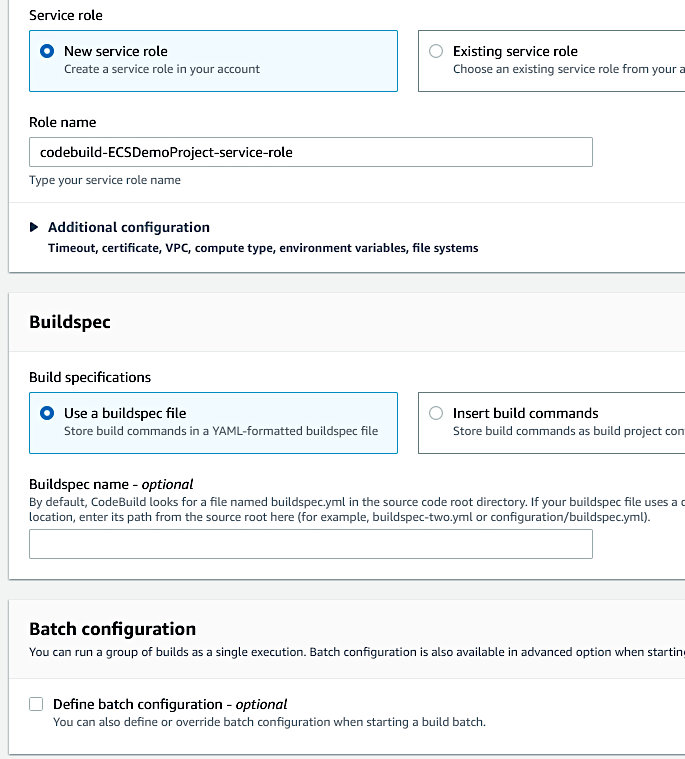
Allow the wizard to create a service role for the build. Accept all other defaults.
Something important to note about the auto-generated service role was that I had to augment it in order to achieve a successful build. It was missing various permissions that made the build continuously fail. I added an extra inline policy that I named “extraECRPolicy” to the auto-generated policy “codebuild-ECSDemoProject-service-role”.
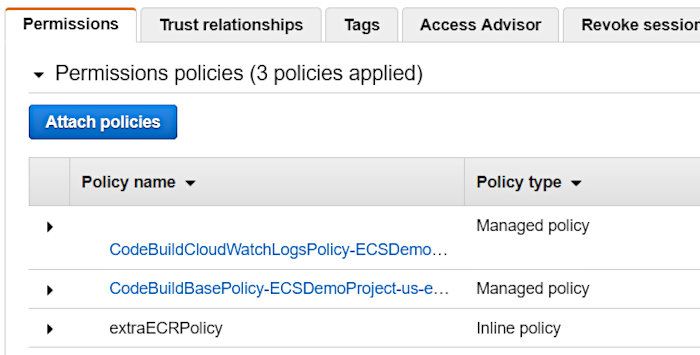
This ended up looking like the following.
{
    "Version": "2012-10-17",
    "Statement": [
        {
            "Effect": "Allow",
            "Action": [
                "ecr:GetAuthorizationToken"
            ],
            "Resource": [
                "*"
            ]
        },
        {
            "Effect": "Allow",
            "Action": [
                "ecr:UploadLayerPart",
                "ecr:BatchCheckLayerAvailability",
                "ecr:GetDownloadUrlForLayer",
                "ecr:GetRepositoryPolicy",
                "ecr:ListImages",
                "ecr:DescribeImages",
                "ecr:BatchGetImage",
                "ecr:InitiateLayerUpload",
                "ecr:CompleteLayerUpload",
                "ecr:PutImage"
            ],
            "Resource": [
                "arn:aws:ecr:us-east-2:AWS_ACCOUNT_ID:repository/s3upload2"
            ]
        }
    ]
}
Make sure to update the resource ARN when configuring this inline policy.
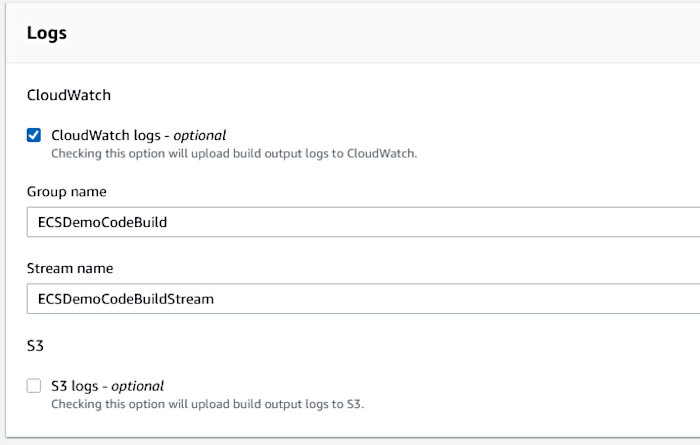
It doesn’t hurt to have CloudWatch logs. I chose the following settings.
With all inputs properly configured, click the “Continue to CodePipeline” button.
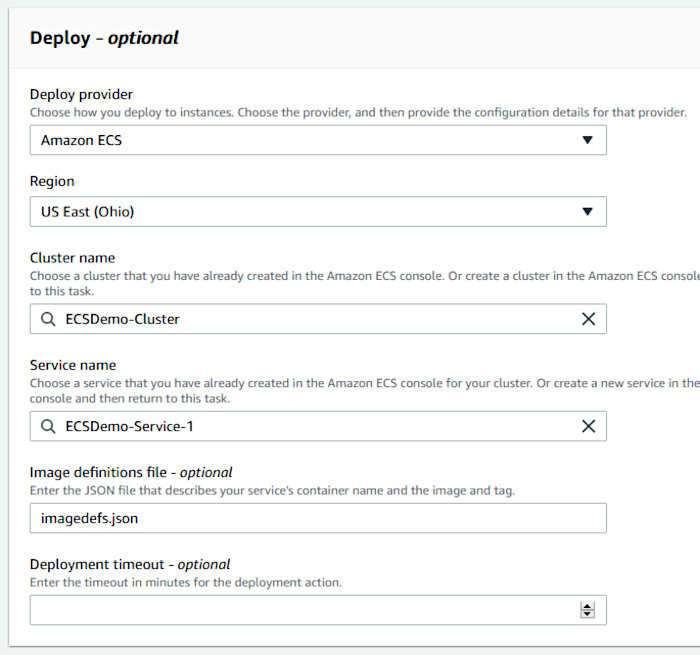
Back in the original CodePipeline creation wizard, choose “Amazon ECS” for the provider in the Deploy stage configuration and ensure that you select the cluster created during the CF stack creation and the service we generated via the AWS CLI. Also, make sure to specify “imagedefs.json” in the “Image definitions file” field as this is needed to create a new revision of the service’s task definition.
Review all of your settings and then click the “Create pipeline” button. The deployment will commence at this point. You’ll then be presented with something like the following should your CodePipeline pipeline execute successfully.
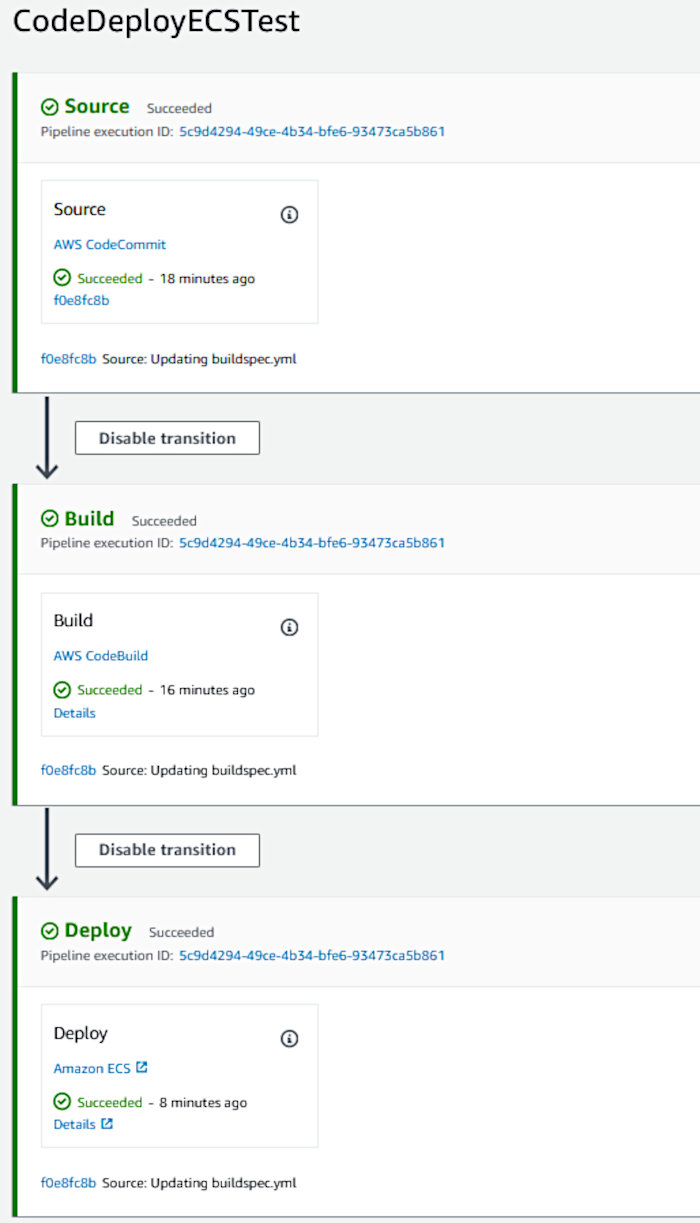
All of the pipeline stages will be blue at first. It’s only until each stage succeeds that they turn green.
While the deployment is taking place, you can head over to the Cluster interface and watch new tasks launch using the updated task definition.
Check out the EC2 Target Groups interface and watch the tasks get registered by the deployment, as well.
Seeing all three CodePipeline stages turn green and each of the new tasks successfully register with the load balancer means we’ve witnessed our deployment succeed. Woohoo!!! Hard work pays off!!!

But before we move forward, I need to point out that we just deployed the same “seed” container that we initially started with. We didn’t push any new updates to our CodeCommit repository to initiate a build and subsequent deployment. The CodePipeline creation process kicks off both of these by default.
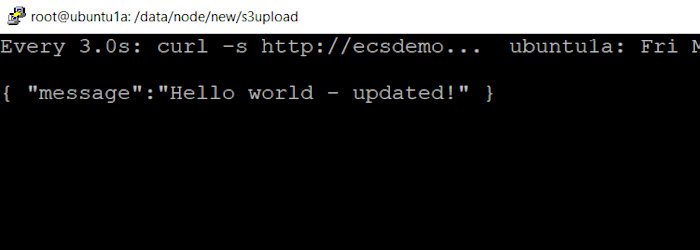
Knowing this, let’s go ahead and make a change to our application and verify its deployment. Much like my previous blog post, we’ll modify index.js (in the API code-base) to return “Hello world – updated!”, instead of just “Hello world”, for the apex route and push a new commit.
Watching the pipeline stages all turn from blue to green indicated success. Testing the load balancer also showed that the update was deployed.
I executed the following command on my local system and waited for the magic to happen.
watch -n 3 "curl -s http://ecsdemo-elb-1-2068323841.us-east-2.elb.amazonaws.com"
Prior to the deployment, I saw the following.
After the deployment succeeded I saw.
And finally, testing the application’s functionality also proved successful.
And there you have it. A successful implementation of an AWS CI/CD pipeline using CodeCommit, CodeDeploy, and CodeBuild within the context of an ECS cluster. This took much longer than I had anticipated but after it’s all said-and-done, I am glad I worked through it. I learned a lot during the process and hope you did, too!
Thanks for reading! Until next time…